The login page contains a little form where the users insert their credentials (user name and password) to access to some part of the web site.
There are different types of login templates. In this example we will see how to use the:
- Login page
- Modal login
1. Get login template
To find a login template is really easy and there are a lot free!! You only need to search in google with “bootstrap login template” or something similar.

2. Login page
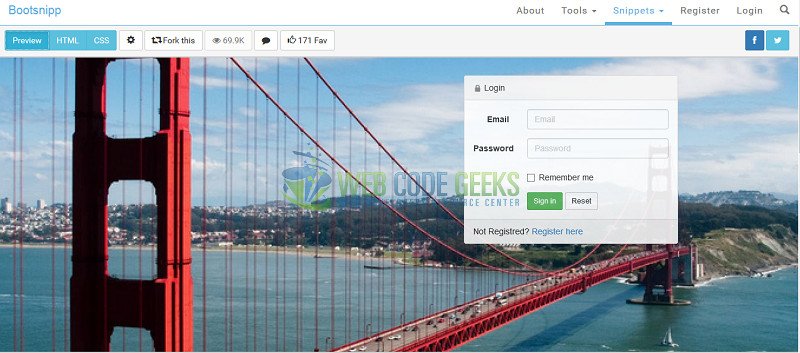
In this example we are going to use the Full Page Log In With Background theme. You can download it from here. The bootsnipp page has a template preview, the HTML, CSS and JavaScript files; You need to copy and paste the resources inside your project.
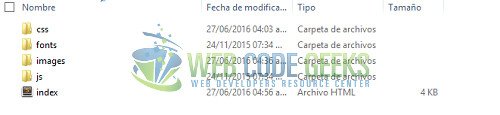
You need to:
- Download bootstrap and unzip it.
- Crate the index.html page to add the div provided by the theme.
- Create a login.css file inside css folder and link it on index.html.
- Create the images folder
You will have a structure like this:
2.1 Change background
I changed the background image, first I added the background.jpg image inside images folder and modify the body rule on the login.css file; now it looks like this:
body {
  background: url("../images/background.jpg") no-repeat center center fixed;
  -webkit-background-size: cover;
  -moz-background-size: cover;
  -o-background-size: cover;
  background-size: cover;
}
Note: Please, be careful with the image resolution; this should be shown correctly in good quality.
2.2 Modify login form
I changed the id of each input on the form and set a name attribute to process it after; I also added id to the row div, it will be useful when the user switches between login and register form.
The login and register form have a heading where indicate the name of the form and a footer where is the link to the other form.
Login form
<div class="row" id="login">
  <div class="col-md-4 col-md-offset-7">
    <div class="panel panel-default">
      <div class="panel-heading">
         <span class="glyphicon glyphicon-lock"></span> Login</div>
      <div class="panel-body">
      <form class="form-horizontal" role="form">
        <div class="form-group">
          <label for="loginMail" class="col-sm-3 control-label">
           Email</label>
          <div class="col-sm-9">
            <input type="email" class="form-control" name="loginMail" id="loginMail" placeholder="Email" required>
          </div>
        </div>
        <div class="form-group">
          <label for="loginPass" class="col-sm-3 control-label">
          Password</label>
          <div class="col-sm-9">
            <input type="password" class="form-control" name="loginPass" id="loginPass" placeholder="Password" required>
          </div>
        </div>
        <div class="form-group last">
          <div class="col-sm-offset-3 col-sm-9">
            <button type="submit" class="btn btn-success btn-sm">
            Sign in</button>
          </div>
        </div>
      </form>
    </div>
    <div class="panel-footer">
      Not Registered? <a>Register here</a></div>
    </div>
  </div>
</div>
2.3 Add the register form
I created the register form, it’s so similar to login form; I only added the confirm password input, changed the header and footer form.
Register form
<div class="row" id="create">
  <div class="col-md-4 col-md-offset-7">
    <div class="panel panel-default">
      <div class="panel-heading">
        <span class="glyphicon glyphicon-plus"></span> New Account</div>
        <div class="panel-body">
          <form class="form-horizontal" role="form">
            <div class="form-group">
              <label for="newMail" class="col-sm-3 control-label">
              Email</label>
              <div class="col-sm-9">
                <input type="email" class="form-control" name="newMail" id="newMail" placeholder="Email" required>
              </div>
            </div>
            <div class="form-group">
              <label for="newPass" class="col-sm-3 control-label">
              Password</label>
              <div class="col-sm-9">
                <input type="password" class="form-control" name="newPass" id="newPass" placeholder="Password" required>
              </div>
            </div>
            <div class="form-group">
              <label for="confirmPass" class="col-sm-3 control-label">
              Confirm password</label>
              <div class="col-sm-9">
                <input type="password" class="form-control" name="confirmPass" id="confirmPass" placeholder="Confirm password" required>
              </div>
            </div>
             <div class="form-group last">
               <div class="col-sm-offset-3 col-sm-9">
                  <button type="submit" class="btn btn-success btn-sm">
                Sign in</button>
                </div>
              </div>
          </form>
        </div>
        <div class="panel-footer">
          Already registered <a>Sign in</a></div>
        </div>
  </div>
</div>
The index.html page look like this:

2.4 Switch between login and register form
We want the user to only sees one form at a time. Next I added the hide class to the create div.
To change the hide class between create and login row div, I created a login.js file. I get the element by document.getElementById function and add/remove the class with classList.remove or clasList.add
login.js
function create(){
  document.getElementById("create").classList.remove("hide");
  document.getElementById("login").classList.add("hide");
}

function login(){
  document.getElementById("login").classList.remove("hide");
  document.getElementById("create").classList.add("hide");
}
I set the onClick to call the correspondent Javascript function
Login footer
<div class="panel-footer">
  Not Registered? <a onClick="create()">Register here</a></div>
</div>
Create footer
<div class="panel-footer">
  Already registered <a onCLick="login()">Sign in</a></div>
</div>
2.5 Functionality
You need to decide how your forms will be processed, you can use PHP, Java or anything else. In my case I decide to use JavaScript then, the onsubmit property is set with a javascript function only to simulated the functionality; If you want to learn more about how you can do it in a right way, you can check the login form in PHP example.
Please, always notify to the user if the login failed, to that I add an error div inside the div form with class="hide"; this will be unhide when an error occurs.
<div class="alert alert-danger hide" id="error">
  <b>Error </b>User or password is incorrect.
</div>
I created a loginCheck function inside login.js; If the mail is nallely@novella.com and the password is Wcg2016 you will be redirected to webcodegeeks page, or else you will see the message error. The function return false to indicate that the page won’t be reloaded after the submit form.
function loginCheck(){
  var loginMail = document.getElementById("loginMail").value;
  var loginPass = document.getElementById("loginPass").value;
  if(loginMail == "nallely@novella.com" && loginPass == "Wcg2016"){
    document.getElementById("error").classList.add("hide");
    window.location.replace("http://webcodegeeks.com");
  }else{
    document.getElementById("error").classList.remove("hide");
  }
  return false;
}
3. Modal login
Sometimes we have an index page with a special information inside and we don’t want to modify it or waste space with a login form, in that case the modal login is a good solution; the link to the login/register form could always be visible and we don’t need a special page; in this case we going to use the modal login with JQuery Effects template inside of a nav bar.
3.1 Get template
The template has a login, register and forgot password form, it’s from bootsnipp page then, you need to:
- Download bootstrap and unzip it.
- Crate the index.html page to add the HTML content of the theme.
- Create a modal.css file inside css folder and link it on index.html.
- Create a modal.js file inside js folder and link it on index.html.
This template has the functionality to navigate between the three forms; You don’t need to worry about it.
3.2 Create a navigation bar
The template has a row content with a paragraph and button; I changed it to a nav bar like the following:
<nav class="navbar navbar-default navbar-static-top">
  <div class="container-fluid">
    <div class="navbar-header">
      <a class="navbar-brand" href="#">
       <li class="glyphicon glyphicon-briefcase"></li>
      </a>
    </div>
    <div class="navbar-right">
      <p class="navbar-text"><a href="#" data-toggle="modal" data-target="#login-modal">Sign in/Sign up</a></p>
    </div>
  </div>
</nav>
The navigation bar looks like this:

3.3 Functionality
This template has all the functionality on the modal.js file. You can modify all that you want there.
4. Resume
The login forms are useful when you need to restrict the access to your website; this provide all the graphic elements and sometimes, the templates have a register and forgot password form; but the functionality of each one, needs to be developed as you want.
