In this example, we’ll go through the cursor property of CSS. More specifically, we’re going to exaplain the pointer property value. The cursor CSS property specifies the mouse cursor displayed when the mouse pointer is over an element. In the case of the pointer value, the cursor is a pointer and indicates a link.
The cursor property in CSS controls what the mouse cursor will look like when it is located over the element in which this property is set. Obviously, it only is relevant in browsers/operating systems in which there is a mouse and cursor. They are used essentially for UX – as they convey the idea of certain functionality.
1. Basic Document Setup
Go ahead and create a new html document and add the basic sytnax in it like so:
<!DOCTYPE html>
<html>
<head>
	<title>CSS Cursor Pointer Example</title>
</head>
<body>

<!-- STYLE SECTION -->

<style type="text/css">

</style>

<!-- HTML SECTION -->

</body>
</html>
In the HTML section, we’ll add several lines of div’s, each of which will contain a specific cursor property value inline. All of the elements will have tha same box class, which will give the elements a basic styling. Because the cursor property is the only to change accross elements, we don’t need to define that in a Style Section, instead we can do that inline.
2. Cursor Property Values
To begin, do notice the general application structure: element/class { cursor: value }. The possible values of it are:
– alias – the cursor indicates an alias of something is to be created.
– all-scroll – the cursor indicates that something can be scrolled in any direction.
– auto – default. The browser sets a cursor
– cell – the cursor indicates that a cell (or set of cells) may be selected.
– context-menu – the cursor indicates that a context-menu is available.
– col-resize – the cursor indicates that the column can be resized horizontally.
– copy – the cursor indicates something is to be copied.
– crosshair – the cursor render as a crosshair.
– default – the default cursor.
– e-resize – the cursor indicates that an edge of a box is to be moved right (east).
– ew-resize – indicates a bidirectional resize cursor.
– grab – the cursor indicates that something can be grabbed.
– grabbing – the cursor indicates that something can be grabbed.
– help – the cursor indicates that help is available.
– move – the cursor indicates something is to be moved.
– n-resize – the cursor indicates that an edge of a box is to be moved up (north).
– ne-resize – the cursor indicates that an edge of a box is to be moved up and right (north/east).
– nesw-resize – indicates a bidirectional resize cursor.
– ns-resize – indicates a bidirectional resize cursor.
– nw-resize – indicates that an edge of a box is to be moved up and left (north/west).
– nwse-resize – indicates a bidirectional resize cursor.
– no-drop – indicates that the dragged item cannot be dropped here.
– none – no cursor is rendered for the element.
– not-allowed – indicates that the requested action will not be executed.
– pointer – the cursor is a pointer and indicates a link.
– progress – the cursor indicates that the program is busy (in progress).
– row-resize – the cursor indicates that the row can be resized vertically.
– s-resize – the cursor indicates that an edge of a box is to be moved down (south).
– se-resize – the cursor indicates that an edge of a box is to be moved down and right (south/east).
– sw-resize – the cursor indicates that an edge of a box is to be moved down and left (south/west).
– text – the cursor indicates text that may be selected.
– vertical-text – The cursor indicates vertical-text that may be selected.
– w-resize – The cursor indicates that an edge of a box is to be moved left (west).
– wait – The cursor indicates that the program is busy.
– zoom-in – The cursor indicates that something can be zoomed in.
– zoom-out – The cursor indicates that something can be zoomed out.
Now in a single code snippet, let’s see most of them in action:
<!-- HTML SECTION  -->
<div class="box" style="cursor:auto">auto</div>
<div class="box" style="cursor:crosshair">crosshair</div>
<div class="box" style="cursor:default">default</div>
<div class="box" style="cursor:e-resize">e-resize</div><br>
<div class="box" style="cursor:grab">grab</div>
<div class="box" style="cursor:help">help</div>
<div class="box" style="cursor:move">move</div>
<div class="box" style="cursor:n-resize">n-resize</div><br>
<div class="box" style="cursor:ne-resize">ne-resize</div>
<div class="box" style="cursor:nw-resize">nw-resize</div>
<div class="box" style="cursor:pointer">pointer</div>
<div class="box" style="cursor:progress">progress</div><br>
<div class="box" style="cursor:s-resize">s-resize</div>
<div class="box" style="cursor:se-resize">se-resize</div>
<div class="box" style="cursor:sw-resize">sw-resize</div>
<div class="box" style="cursor:text">text</div><br>
<div class="box" style="cursor:w-resize">w-resize</div>
<div class="box" style="cursor:wait">wait</div>
<div class="box" style="cursor:not-allowed">not-allowed</div>
<div class="box" style="cursor:no-drop">no-drop</div><br>
<!-- STYLE  SECTION -->
<style type="text/css">
.box {
    width: 10em;
    height: 8em;
    border: 0.1em solid black;
    background-color: ghostwhite;
    display: inline-block;
    text-align: center;
    line-height: 8em;
    margin: 0.5em;
    font-family: "Aller";
}
</style>
The following image shows how every cursor value renders like: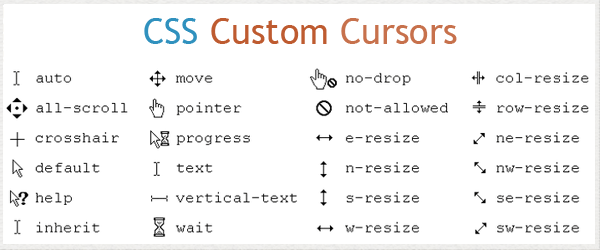
Find the attached file below in the download section, where you have a more complete view of the values.
3. More About Cursor Pointer
The cursor pointer value is a default value for links, no need to add that while you have a normal anchor tag with href.
<a href="#">This is a link</a>
Here is what it looks like (nothing special, you’ve seen this):
But, consider having expandable li elements or buttons, you’d have to add the cursor pointer by yourself like so:
<li style="cursor:pointer">This sentence might be an expandable section.</li>
<button style="cursor:pointer">Button Here</button>
We’d have the following view of the pointer in the browser:
But what happens if an anchor tag does not have a href next to it? Well, the default pointer won’t show, and you have to add it as an attribute. I have done that in the download files.
4. Conclusion
The cursor property is an all-in-one solution for indicating different actions one will take, in a visual manner. It makes it easier for the user to be aware of what’s ahead. It wraps up around twenty different values that we explained above. Next part, try them yourselves and create different states on “hover” to express the action elements apply. Refer to the downloadable files to see and find what value you need and keep in mind that some elements like links have a default pointer value pre set.
5. Download
You can download the full source code of this example here: CSS Cursor Pointer
