The aim of this example is to show how you can create tables with HTML and style them with CSS, including specific and various examples.
Since web pages are loaded with a lot of information, it sometimes becomes a neccesity organising data in a more easy-to-read and intuitive way.
That is where CSS can be of great help. Below you can find a complete guide to CSS Tables, from the html setup to the stylish viewpoint of table rows and cells.
1. The Initial Layout
First, go on and create a html file. This file is going to be the one we are putting both HTML and CSS code so as to keep it as simple as possible. However, when considering more complicated webpages with a lot of HTML, I recommend you separate the styling code in a css file.
1.1 Setting up the HTML
The initial layout consists of creating the basic structure of html we need.
To do this, let’s first explain what kind of tags do we have for tables in html and what do they mean:
1. table – this tag defines a table in html.
2. tr – this tag divides the table into table rows.
3. td – this tags creates the cell, it means table data.
4. th – this tag creates a table heading.
With this said, let’s create the basic table structure in html with randomly 3 rows and 3 columns, like below:
<!DOCTYPE html>
<html>
<head>
	<title>CSS Tables Example</title>
</head>
<body>

<table>
  <tr>
    <th></th>
    <th></th>
    <th></th>
  </tr>
  <tr>
    <td></td>
    <td></td>
    <td></td>
  </tr>
  <tr>
    <td></td>
    <td></td>
    <td></td>
  </tr>
</table>

</body>
</html>
As you can see, we created the table tag inside the body tag. After this, we added first the rows tag tr and inside each row the table data (or cells) with the td tag. Notice we also added a table heading row using the th tag, in the first row.
By default, you should not see anything shown in the browser until now, and that is because we only created the table, but did not put there any data or styling, so both information and layout are missing. We’ll add them soon.
1.2 Understanding the Style Basics
Our table needs to be filled, so let’s give it some random information in this example. To give it styling and layout attributes
we create a style tag where all the css code is going to be put. To begin, I am giving this table two attributes:
1. width attribute of 40% (a normal width for having a pleasant view of the table, we will add custom width later)
2. border attribute of 0.1em solid to the table, th and td tags.
The code now looks like this:
	<style type="text/css">

	table {
	width: 40%;
	border: 0.1em solid;	}

	td {
	border: 0.1em solid;	}

	th {
	border: 0.1em solid;	}

	</style>
	<table >
	<tr>
    <th>Name</th>
    <th>Surname</th>
    <th>Age</th>
  </tr>
  <tr>
    <td>Fabio</td>
    <td>Cimo</td>
    <td>20</td>
  </tr>
  <tr>
    <td>Jasmin</td>
    <td>Brown</td>
    <td>18</td>
  </tr>
</table>
And this is what the table in the browser looks like:
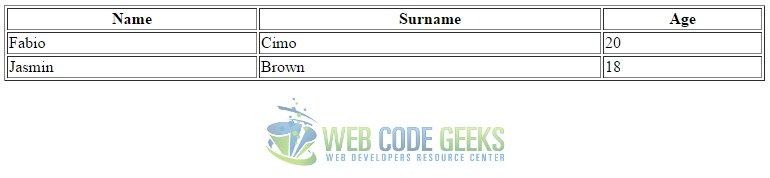
Notice that the table headings are set in a bold style and centered position by default by the browser.
So remember that whatever you put inside the th tag is styled this way everytime, but you can change it.
Other table data, like the cell information is just normal text and aligned left by default.
You probaby see that every cell has its own surrounding/separate border and that looks just bad.
We fix that with the border-collapse:collapse attribute given to the table.
(We are later in this article going to have a closer look to the border-collapse property)
That eleminates the need for border attributes inside the table tag.
Lets also align all the table data (td tag) in the center.
Now we have a code that looks like this in the style section:
	<style type="text/css">

	table {
	width: 40%;                        /* the 'border' attribute is removed here */
	border-collapse:collapse }

	td {
	border: 0.1em solid;
	text-align: center;	}

	th {
	border: 0.1em solid;
	text-align: center;	}

	</style>
The result in the browser would be:
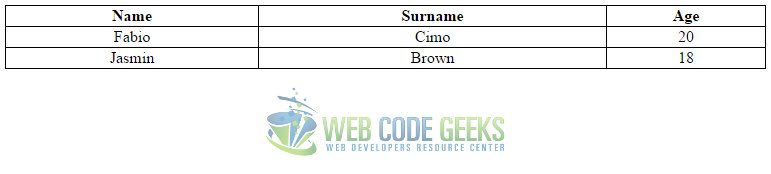
Now we can say we have created a simple table that looks fine. But there are lots of other styles we can apply to make this table look a lot more interesting and attractive.
2. Modifying Table Elements Styles
Up until now, we used a 40% width attribute for our table.
Now we will see a more specific way for adjusting the width of the table, defined by the width of every cell.
2.1 Spacing
There are several spacing considerations when talking about table/row/cell sizes. Two of them are most popular and shown below.
1. Set the size of of your table according to the desired width of the cells and height of the rows like this:
	<style type="text/css">

	table {
	                               /* the 'width: 40%' attribute is removed here */
	border-collapse:collapse }

	td {
	border: 0.1em solid;           /* cells have their 'border' attribute */
	text-align: center;
	width: 10em;	}             /* added cell width */

	th {
	border: 0.1em solid;         /* cells have their 'border' attribute */
	text-align: center;
	width: 10em;	}            /* added cell width */

	tr {
	height: 2em;	}           /* added row height */


	</style>
This would make the cells 10em wide and rows 2em high. And we’d get this view:
2. Set an inner space called padding to the cells (and/or headings of the table) by adding this attribute to the style like this:
	<style type="text/css">

	table {
	border: 0.1em solid;
	border-collapse:collapse }

	td {
	border: 0.1em solid;
	text-align: center;
	width: 10em;
	padding: 1em;	}				/* added cell padding to the table data cells */

	th {
	border: 0.1em solid;
	text-align: center;
	width: 10em;
	padding: 2em;	}				/* added cell padding to the heading cells */

	tr {
	height: 2em;	}


	</style>
In this case, I added a 2em padding to the heading cells and 1em to the data cells.

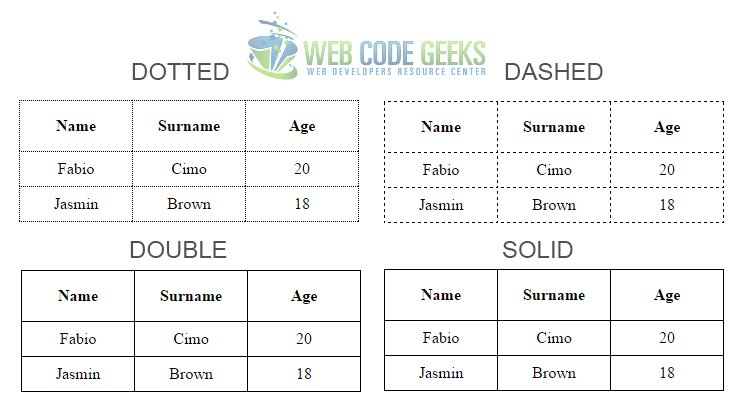
2.2 Border Styling
Until now, we have set a 1px solid border style for our table. And that is just good.
But lets see other options and customizations we can apply to the table border.
dotted – dotted border
dashed – dashed border
solid – solid border
double – double border
The way we apply border styles is as in the code below:
	<style type="text/css">

	table {
	border: 0.1em dashed;             /* added different border style: dashed */
	border-collapse:collapse }

	td {
	border: 0.1em dashed;				/* added different border style: dashed */
	text-align: center;
	width: 5em;
	padding: 0.5em;	}

	th {
	border: 0.1em dashed;				/* added different border style: dashed */
	text-align: center;
	width: 5em;
	padding: 1em;	}

	tr {
	height: 1em;	}


	</style>
For the sake of displaying these four styles in one picture, I have reduced the width and padding of the cells.
We can also have combinations of these styles, using the following:
dotted solid which gives a top and bottom style of dotted and left and right of solid
dotted solid double dashed which gives a specific style to each border.
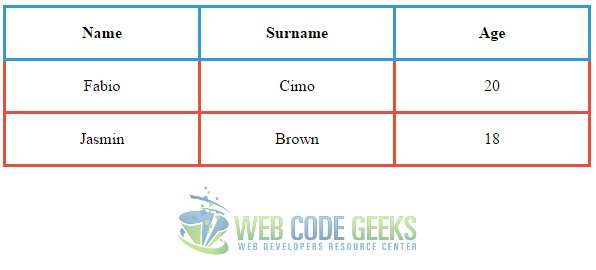
Additionally, borders can have different colors and border-widths than the default by applying:
1. For the color, the border-color attribute or simply adding the color code into the border attribute.
2. For border-width the attribute with the same name or right from the border tag.
All cases are shown below and commented:
	<style type="text/css">

	table {

	border-collapse: collapse;	 }

	td {
	border: solid #e74f3b;				/* added border color inside the border attribute */
	text-align: center;
	width: 10em;
	border-width: 0.2em;				/* added border width as a separate attribute */
	padding: 1em; 			}


	th {
	border: 0.2em solid;				/* added border width inside the border attribute */
	text-align: center;
	width: 10em;
	padding: 1em;
	border-color: #329bd7;		}		/* added border color as a separate attribute */


	tr {
	height: 1em;	}

	</style>
This is what the table looks like after these two modifications on the css code:
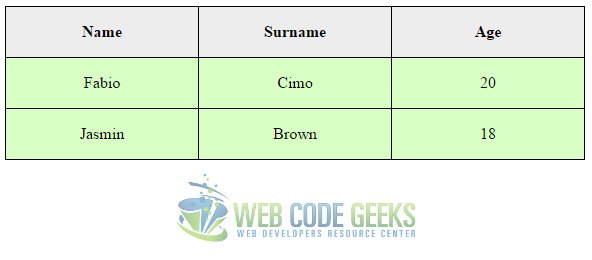
2.3 Cell Styling
Adding a few more lines into our css code will give our cell backgrounds a new look. Let’s remove some of the styling we did before like the border-width and border-color attributes to have a cleaner table.
In the code below, I am giving the heading cells a light gray background and data cells a light green background:
	td {
	border: 0.1em solid;				/* resetted to a default of 0.1em width */
	text-align: center;
	width: 10em;
	padding: 1em;
	background-color: #d8ffc4; 		}	/* added data cell background color (light green) */


	th {
	border: 0.1em solid;				/* resetted to a default of 0.1em width */
	text-align: center;
	width: 10em;
	padding: 1em;
	background-color: #ededed; 		}	/* added heading cell background color (light gray) */
Refreshing the browser, the result would be:
3. Advanced Layout & Style Customization
Even though we have covered a lot until now, there are still some interesting layout and styling changes that might be of great help to our specific cases. So we start with the layout changes we can use.
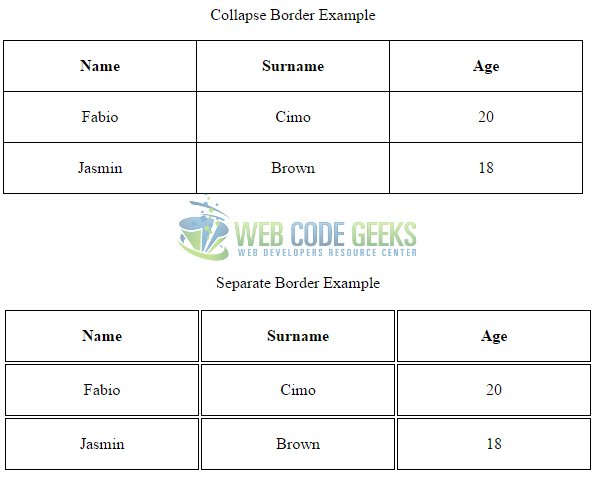
3.1 Layout Cases: Border-Collapse Property
border-collapse – this property specifies whether the browser should control the appearance of adjacent borders that touch each other or whether each cell should maintain its style. It can have two possible values:
border-collapse:collapse and border-collapse:separate
The code below shows both cases: (duplicated our table code to have 2 tables in order to show both these two properties):
CSS
	<style type="text/css">

	table.one {
	border-collapse: collapse;		/* added border collapse:collapse to the first table */
	margin-bottom: 5em;	}

	table.two {
	border-collapse: separate;	}	/* added border collapse:separate to the second table */

	caption {
	padding-bottom: 1em;	}               /* added caption padding to make it distinctive */

	td {
	border: 0.1em solid;
	text-align: center;
	width: 10em;
	padding: 1em; 		}

	th {
	border: 0.1em solid;
	text-align: center;
	width: 10em;
	padding: 1em;		}

	tr {
	height: 1em;	}

	</style>
HTML
<table class="one">
	<caption>Collapse Border Example</caption>  <!-- added table caption -->
	<tr>
    <th>Name</th>
    <th>Surname</th>
    <th>Age</th>
  </tr>
  <tr>
    <td>Fabio</td>
    <td>Cimo</td>
    <td>20</td>
  </tr>
  <tr>
    <td>Jasmin</td>
    <td>Brown</td>
    <td>18</td>
  </tr>
</table>

	<table class="two">
	<caption>Separate Border Example</caption>	<!-- added table caption -->
	<tr>
    <th>Name</th>
    <th>Surname</th>
    <th>Age</th>
  </tr>
  <tr>
    <td>Fabio</td>
    <td>Cimo</td>
    <td>20</td>
  </tr>
  <tr>
    <td>Jasmin</td>
    <td>Brown</td>
    <td>18</td>
  </tr>
</table>
In this example I also added table captions just by adding the caption tag under the table tag.
And referred to captions in css by giving the caption property attributes.
You can also have captions in the top, bottom, left or right of the table according to your needs.
You can achieve this by adding the caption-side attribute in your css code under the caption class.
The view we are going to get is this:
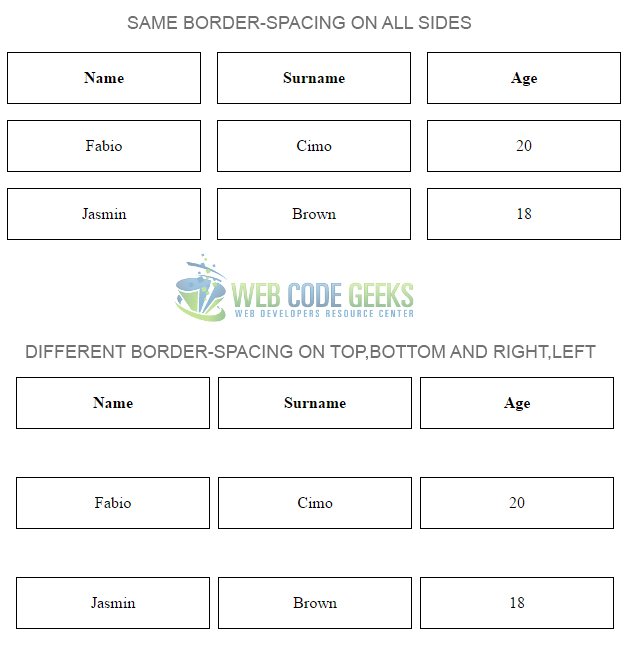
3.2 Layout Cases: Border-Spacing Property
border-spacing – specifies the distance that separates adjacent cells, borders. It can take one or two values according to the spacing you need on different sides.
The code below shows both cases:
	table.one {
	margin-bottom: 5em;
	border-collapse:separate;
	border-spacing: 1em;  }			/* added the same top,bottom,right,left border spacing  */

	table.two {
	border-collapse:separate;
	border-spacing: 0.5em 3em;	}	/* added different top,bottom and right,left border spacing  */
In this case, we get the following view:
3.3 Layout Cases: Empty-Cells Property
empty-cells – used to indicate whether a cell without any content should have a border displayed.
It can take 3 values:
show – given this attribute, all empty cells will show.
hide – given this attribute, all empty cells will hide.
inherit – given this attribute, all empty cells will by default show.
All three cases are shown in the code below with the respective comments:
	table.one {
	margin-bottom: 3em;
	border-collapse:separate;
	empty-cells: inherit;  }	/* added empty-cells property: inherit */

	table.two {
	margin-bottom: 3em;
	border-collapse:separate;
	empty-cells: show; }		/* added empty-cells property:show  */

	table.three {
	border-collapse:separate;
	empty-cells: hide; }		/* added empty-cells property:hide  */
Note that the empty-cells property only works when the border-collapse attribute is set to sepatare.
Here are the 3 results we get:
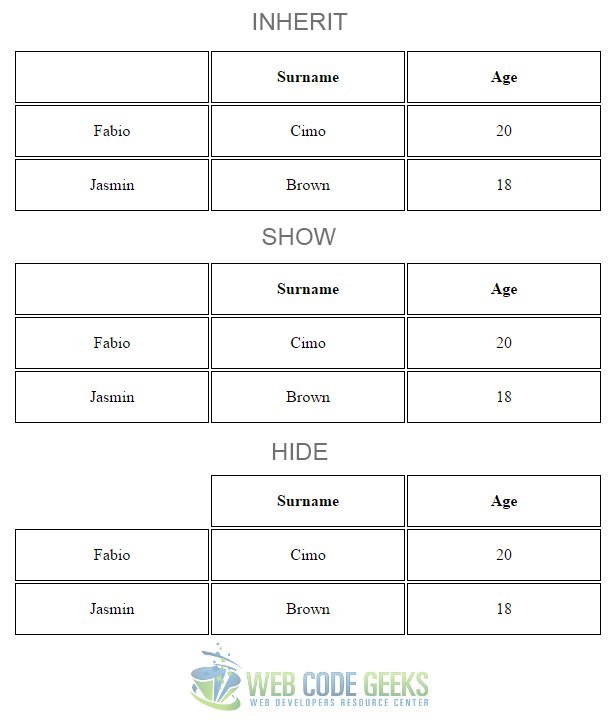
In this case, to demonstrate the empty-cells property, I removed the first table heading from the html as below:
<tr>
    <th></th>           <!-- removed text from here to have an empty cell -->
    <th>Surname</th>
    <th>Age</th>
</tr>
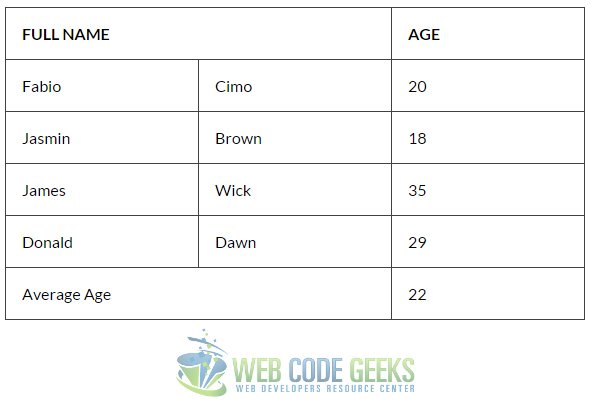
3.4 The ‘colspan’ Attribute
colspan="" – defines the number of columns a cell should span.
This attribute is given inside the th or td opening tag in html.
The number is put inside the quotes. It can be useful when you need different divisions of cells for different rows.
Application of the colspan attribute is as follows:
<tr>
    <th colspan="2"> FULL NAME</th>
    <!-- removed second th and added a colspan on the first -->
    <th>AGE</th>
</tr>
<!-- other rows here -->
<tr>
    <td colspan="2">Average Age</td>
    <!-- removed second th and added a colspan on the first -->
    <td>22</td>
</tr>
In the browser, the table would looke like this:
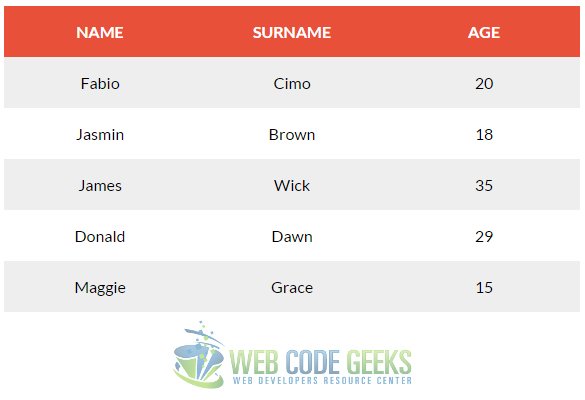
3.5 Table Design
Professional looking tables come with some simple and eye-catching design.
There is a pseudo-selector in css that we call went we want specific elements (the child) to be the same out of a larger element (the parent). This is the nth-child(). Inside the brackets we add a condition. Lets see the code below:
	<style type="text/css">

	table {
	font-family: "Lato","sans-serif";	}		/* added custom font-family  */

	table.one {
	margin-bottom: 3em;
	border-collapse:collapse;	}

	td {							/* removed the border from the table data rows  */
	text-align: center;
	width: 10em;
	padding: 1em; 		}

	th {							  /* removed the border from the table heading row  */
	text-align: center;
	padding: 1em;
	background-color: #e8503a;	     /* added a red background color to the heading cells  */
	color: white;		}			      /* added a white font color to the heading text */

	tr {
	height: 1em;	}

	table tr:nth-child(even) {		      /* added all even rows a #eee color  */
        background-color: #eee;		}

	table tr:nth-child(odd) {		     /* added all odd rows a #fff color  */
	background-color:#fff;		}

	</style>
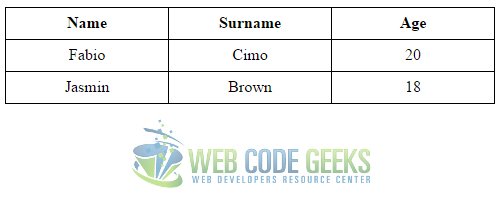
Other elements we changed to enhance the better-looking aspects:
1. font-family – adding a custom font of yours can be a significant improvement to the design of the table
2. border – removing the border of the table and table cells will give it a cleaner and flatter view.
3. even and odd row colors – it makes information inside the table easier to catch.
Now look at this pleasant table view we get:
4. Conclusion
CSS Tables are a great way to organise information inside a webpage as long as we need to structure information.We use them heavily when we want to have our fully customized properties applied regarding the styles and design.
At other cases, you may also use a framework like Bootstrap to create tables faster and with a default style.For more practice on css tables and ideas on table design, check the source files below.
You can download the full source code of this example here: CSS Tables

Thanks for the tutorial
really helpfull