In this example we are going to learn about HTML5 canvas 3D API. Canvas was added to HTML in HTML5. HTML5 canvas is a powerful tool (or container) that is used for drawing images and shapes.

For this example we will use:
- A computer with a modern browser installed
- notepad++
1. Getting Started
In the early days of HTML, 3d in the browser was sort of a myth. Displaying 3d in the browser was difficult or outrightly impossible. Today 3d in the browser is possible with WebGL. WebGL is the standard 3D graphics API for the web. WebGL works with the device hardware to render 3d graphics. WebGL works on modern desktops browsers as well as a growing number of hand held devices. WebGL is an API based on opengl, and it accessed through JavaScript. WebGL works with HTML5 canvas (in browsers that support it) to render 3d graphics (without the use of plugins)
1.1 HTML5 Canvas
HTML5 canvas combined with JavaScript is used to do a lot of things, from drawing, setting transparency levels on images to even animations and game development. An HTML canvas is a rectangular area on the web page. By default, a canvas has no border and it also has no content.
<canvas>

</canvas>
You can create an HTML5 canvas by using the tag above. You can also set the width and height of the canvas within its tag or you can do it with JavaScript. Lets look at the example below:
<canvas width=500 height=500 >

</canvas>
To set the width and height through JavaScript we have to set an ID on our tag.
<canvas id=board >

</canvas>
It is also possible to create HTML5 canvas element on the fly with JavaScriptdocument.createElement() .
index.html
<!DOCTYPE html>
<html lang=en>
	<head>
	<style>
	html, body{
	width:100%;
	height:100%;
	margin:0%;
	font-family:"helvetica","verdana","calibri", "san serif";
	overflow:hidden;
	padding:0%;
	border:0%;
	}

	</style>
	 		<meta charset="utf-8" />
		<meta name="viewport" content="width=device-width, initial-scale=1.0, maximum-scale=1.0, user-scalable=no, target-densitydpi=device-dpi"/>

	<title>HTML5 canvas test</title>

	</head>
	<body onload=init()>
<script>
//function called when page load is finished
function init(){
var canvas=document.getElementById("board");// get the canvas element
canvas.width=document.body.clientWidth;//set the width of the canvas to the body of the page
canvas.height=document.body.clientHeight;//set the height of the canvas to the body of the page


}

</script>

	<canvas id=board>

	</canvas>

	</body>
	</html>
1.2 Rendering 3D
To render 3d With WebGL, we first need to create or get access to a canvas. Let’s see how to do that in the code fragment below:
<canvas id="boarf" width="640" height="480">
 </canvas>
Below is the JavaScript code that registers an event listener.
window.addEventListener("load",init);// register an eventlistener for web page onload
In the code fragment above we successfully created our canvas. The init function is called after the page is loaded it simply initializes WebGL. Lets see another code fragment below
gl = null; //set variable to null
// Try initialize the WebGL context. If it fails, try the to experimental.
gl =canvas.getContext('webgl') || canvas.getContext('experimental-webgl');
Let’s look at a full example below:
index2.html
<!DOCTYPE html>
<html lang=en>
	<head>
	<style>
	html, body{
	width:100%;
	height:100%;
	margin:0%;
	font-family:"helvetica","verdana","calibri", "san serif";
	overflow:hidden;
	padding:0%;
	border:0%;
	}

	</style>
	 		<meta charset="utf-8" />
		<meta name="viewport" content="width=device-width, initial-scale=1.0, maximum-scale=1.0, user-scalable=no, target-densitydpi=device-dpi"/>

	<title>HTML5 canvas test</title>

	</head>
	<body onload=init()>
<script>
//function called when page load is finished
function init(){
var canvas=document.getElementById("board");// get the canvas element
canvas.width=document.body.clientWidth;//set the width of the canvas to the body of the page
canvas.height=document.body.clientHeight;//set the height of the canvas to the body of the page

 // Initialize the GL context
 gl = getWebGL(canvas); // Only continue if WebGL is available and working
if (!gl) {
return;
} // Set clear color to black, fully opaque
 gl.clearColor(0.0, 0.0, 0.0, 1.0); // Enable depth testing
 gl.enable(gl.DEPTH_TEST); // Near things obscure far things
 gl.depthFunc(gl.LEQUAL); // Clear the color as well as the depth buffer.
 gl.clear(gl.COLOR_BUFFER_BIT | gl.DEPTH_BUFFER_BIT);
}
function getWebGL(canvas) {
 gl = null; //set variable to null
// Try initialize the WebGL context. If it fails, try the to experimental.
gl =canvas.getContext('webgl') || canvas.getContext('experimental-webgl');
// if we couldnt get a GL context, alert the user about the error
 if (!gl) {
alert("We could not initialize WebGL. You might need to update your browser or upgrade your device hardware");
}
return gl;
 }
</script>

	<canvas id=board>

	</canvas>

	</body>
	</html>
In the code above we initialize the canvas and try to get a 3d context, if we are successful we store the context in a variable or else we alert the user about the error. It is possible for the user to be running an out dated browser on their desktop computer or mobile device. The user can also be using a hardware that doesn’t support OpenGL (WebGL is based on OpenGl).
We have successfully created our WebGL context, lets draw with it.
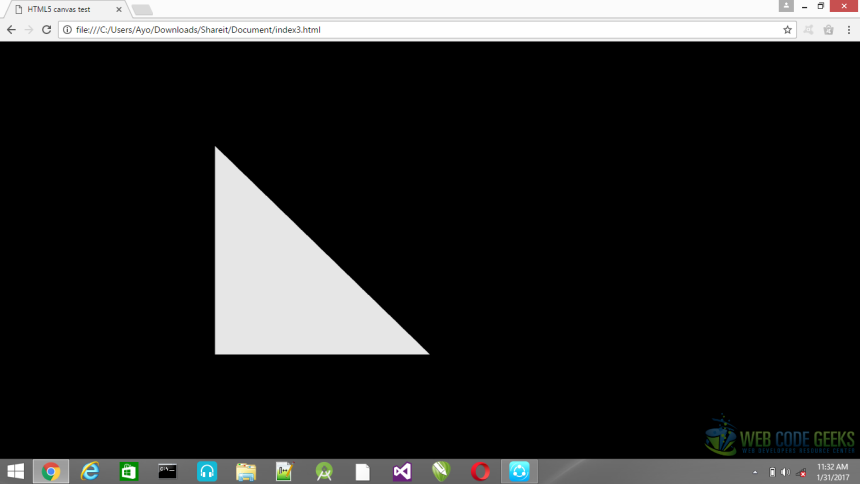
index3.html
<!DOCTYPE html>
<html lang=en>
	<head>
	<style>
	html, body{
	width:100%;
	height:100%;
	margin:0%;
	font-family:"helvetica","verdana","calibri", "san serif";
	overflow:hidden;
	padding:0%;
	border:0%;
	}

	</style>
	 		<meta charset="utf-8" />
		<meta name="viewport" content="width=device-width, initial-scale=1.0, maximum-scale=1.0, user-scalable=no, target-densitydpi=device-dpi"/>

	<title>HTML5 canvas test</title>

	</head>
	<body onload=init()>
<script>
//function called when page load is finished
function init(){
 canvas=document.getElementById("board");// get the canvas element
canvas.width=document.body.clientWidth;//set the width of the canvas to the body of the page
canvas.height=document.body.clientHeight;//set the height of the canvas to the body of the page

 // Initialize the GL context
 gl = getWebGL(canvas); // Only continue if WebGL is available and working
if (!gl) {
return;
} // Set clear color to black, fully opaque
 gl.clearColor(0.0, 0.0, 0.0, 1.0); // Enable depth testing
 gl.enable(gl.DEPTH_TEST); // Near things obscure far things
 gl.depthFunc(gl.LEQUAL); // Clear the color as well as the depth buffer.
 gl.clear(gl.COLOR_BUFFER_BIT | gl.DEPTH_BUFFER_BIT);
draw();
}

function getWebGL(canvas) {
 gl = null; //set variable to null
// Try initialize the WebGL context. If it fails, try the to experimental.
gl =canvas.getContext('webgl') || canvas.getContext('experimental-webgl');
// if we couldnt get a GL context, alert the user about the error
 if (!gl) {
alert("We could not initialize WebGL. You might need to update your browser or upgrade your device hardware");
}
return gl;
 }
function draw(){/*
 /*  Define the geometry and store it in buffer objects */

//Vertices are the points in 3D space that define the shapes we’re drawing
var vertices = [-0.5, 0.5, -0.5, -0.5, 0.0, -0.5,];
// Create a new buffer object

var vertex_buffer = gl.createBuffer();

// this line tells WebGL that any following operations that act on buffers should use the one we specify, buffers are things that hold the details of the the triangle and the square that we’re going to be drawing
 gl.bindBuffer(gl.ARRAY_BUFFER, vertex_buffer);
// We pass the vertices data into the buffer, with a float32Array using our JavaScript list
 gl.bufferData(gl.ARRAY_BUFFER, new Float32Array(vertices), gl.STATIC_DRAW);

// we can now unbind the buffer
 gl.bindBuffer(gl.ARRAY_BUFFER, null);

 // Vertex shader source code
 var vertCode = 'attribute vec2 coordinates;' + 'void main(void) {' + ' gl_Position = vec4(coordinates,0.0, 1.0);' + '}';
//Create a vertex shader object
var vertShader = gl.createShader(gl.VERTEX_SHADER);
//Attach vertex shader source code
 gl.shaderSource(vertShader, vertCode);
//Compile the vertex shader
 gl.compileShader(vertShader);
 //Fragment shader source code
var fragCode = 'void main(void) {' + 'gl_FragColor = vec4(0.0, 0.0, 0.0, 0.1);' + '}';
// Create fragment shader object
 var fragShader = gl.createShader(gl.FRAGMENT_SHADER);
// Attach fragment shader source code
 gl.shaderSource(fragShader, fragCode);
 // Compile the fragment shader
gl.compileShader(fragShader);
// Create a shader program object to store combined shader program
 var shaderProgram = gl.createProgram();
// Attach a vertex shader
 gl.attachShader(shaderProgram, vertShader);
// Attach a fragment shader
 gl.attachShader(shaderProgram, fragShader);
// Link both programs
 gl.linkProgram(shaderProgram); // Use the combined shader program object
 gl.useProgram(shaderProgram);

//Bind vertex buffer object
gl.bindBuffer(gl.ARRAY_BUFFER, vertex_buffer);
//Get the attribute location
var coord = gl.getAttribLocation(shaderProgram, "coordinates");
//point an attribute to the currently bound VBO
gl.vertexAttribPointer(coord, 2, gl.FLOAT, false, 0, 0);
//Enable the attribute
 gl.enableVertexAttribArray(coord);

// Clear the canvas and set the color to black
 gl.clearColor(0.0, 0.0, 0.0,1.0);
// Enable the depth test so that things drawn behind should be hidden by things drawn in front
 gl.enable(gl.DEPTH_TEST);
// Clear the color buffer bit
gl.clear(gl.COLOR_BUFFER_BIT);
 // Set the view port, this tells WebGL about the size of the canvas
gl.viewport(0,0,canvas.width,canvas.height);
// Draw the triangle
 gl.drawArrays(gl.TRIANGLES, 0, 3);


}


</script>

	<canvas id=board>

	</canvas>

	</body>
	</html>
We draw a triangle on our canvas. The code has comments at each step which explains everything we have done.
2. Summary
In this example we learnt about 3d in the browser. We also learnt about WebGL, vertices, shaders and how to use them to draw a triangle on a canvas with a WebGL context.
3. Download the source code
Download
You can download the full source code of this example here: html53dcanvastutorial
