1. Introduction
In this article, we will look at how to capture images as well as video from user’s webcam. There have been several iterations to enable access to devices from JavaScript. Starting from special attributes for existing input tags to getUserMedia part of the WebRTC APIs. We will look at how to use these and leverage them for accessing devices, specifically, webcam from the browser.

Table of Contents
2. Tools & Technologies
The toolset for the project that we are going to build is as follows:
We use Nodejs and the express module to quickly spin up a bare minimum Web Server to serve our HTML files. I have used the Integrated Development Environment that I’m most comfortable with, i.e., Visual Studio Code.
3. Project Layout
Our project has the layout as shown below:
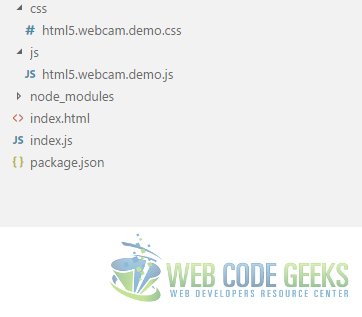
css folder
This folder stores our css files that we create and use for the UI of the project.
js folder
This folder has the client side JavaScript files we write for this project.
index.html
This is our main landing page with all the HTML markup.
index.js
This is our server side JavaScript file where our barebones web server resides and is the starting point of the application.
4. Capture Webcam
To capture the video from the Webcam we will use getUserMedia HTML5 API. Firstly, we stream the Webcam video to a video element on our page. This does require permission from the user and as soon as we try to access the Webcam the user is asked to approve the same. We also use the constraints object to modify the default video from the Webcam.
To begin with, we place a video Html tag in our index.html page. This is where we will show the video feed from the Webcam. The markup looks like below:
index.html
<video height="480px" width="640px" id="webcamfeed" autoplay controls></video>
Two things to note in the above markup is the autoplay and controls attributes. The autoplay causes the video to start playing once we wire things up like you will see below. The controls attribute specifies that video controls be displayed like play/pause buttons.
Now that we have the markup in place let us look at how to request access to the webcam and wire it to our video element. We use the getUserMedia API call to request access on the click of the capturewebcam button like below:
html5.webcam.demo.js
var captureWebcam = document.getElementById("capturewebcam");
function getUserMedia(){
    if(navigator.getUserMedia){
        navigator.getUserMedia=navigator.getUserMedia||navigator.webkitGetUserMedia
        ||navigator.mozGetUserMedia||navigator.msGetUserMedia;

    }else{
        navigator.getUserMedia=navigator.mediaDevices.getUserMedia;
    }
    return navigator.getUserMedia;
}

captureWebcam.addEventListener("click", function(){
    var media = getUserMedia();
    if(media){
        navigator.getUserMedia({video: { width: 640, height: 480}, audio: false}, function(stream){

            videoElement.src = window.URL.createObjectURL(stream);

        }, function(error){
            //Catch errors and print to the console
            console.log("There was an error in GetUserMedia!!!");
            console.log(error);
        });
    }
});
We set the src attribute of the video element to an ObjectURL created from the stream object returned by the call to getUserMedia attribute. The URL.createObjectURL() static method creates a DOM containing the URL of the BLOB object passed to it, that is the stream object here from getUserMedia API call. The result would look like below, with video from your Webcam, of course.
5. Take a Snap
Let us take a look to an interesting feature where we allow the user to take snapshots from the Webcam. To start with this we will add a canvas element to our HTML. This element will host the snap captured on click of a button by the user. The HTML markup we need to add looks like below:

index.html
<canvas height="480px" width="640px" id="snap"></canvas>
To take a snap we will get the 2d context of the canvas element which allows us to draw an image onto it. Once we have the context all we need to do is to call drawImage method on the context and pass it the video element that is displaying the video from the webcam. We need to add the following:
html5.webcam.demo.js
var videoElement = document.getElementById("webcamfeed");
var captureWebcam = document.getElementById("capturewebcam");
var captureSnap = document.getElementById("takesnap");
var canvas = document.getElementById("snap");

captureSnap.addEventListener("click", function(){
    var context = canvas.getContext('2d');
    context.drawImage(videoElement, 0, 0, 640, 480, 0, 0, 640, 480);
});
6. Applying Filters
Let us do something even more interesting with the snapshots that we have captured. Allow users to apply css filters, which are similar to the filters available in image editing software packages, to the snapshots captured from webcam. Some of the filters that we will look at are: Blur, Sepia and GrayScale.
To start with this implementation we add a select tag and a checkbox markup to our HTML page. The checkbox will switch the filters on and off and the select tag would allow the user to switch between different filters. The markup we add looks like below:
index.html
<input type="checkbox" id="enablefilters" >Enable Filters</input>
<select id="filterName">
    <option value="blur">Blur</option>
    <option value="sepia">Sepia</option>
    <option value="grayscale">GrayScale</option>
    <option value="saturate">Saturate</option>
    <option value="brightness">Brightness</option>
</select>
Also, we create specific CSS classes for applying the above filters. Although we can apply more than one filter function at a time but to keep things simple for the purpose of this tutorial we will only apply one filter at a time. We create the following css classes in our css file:
html5.webcam.demo.css
.blur{
    filter: blur(30px);
}
.grayscale{
    filter: grayscale(100%);
}
.sepia{
    filter: sepia(60%);
}
.saturate{
    filter: saturate(60%);
}
.brightness{
    filter: brightness(150%);
}
Now to finally apply these classes when the “apply filters” checkbox is checked or selection is changed in the filters dropdown we write the following JavaScript in our JS file:
html5.webcam.demo.js
var canvas = document.getElementById("snap");
var filters = document.getElementById("enablefilters");
var filterName = document.getElementById("filterName");

filters.addEventListener("change", function(evt){
    applyFilter(filterName.value);
});
filterName.addEventListener("change", function(evt){
    applyFilter(filterName.value);
});
function applyFilter(fName){
    if(filters.checked){
        canvas.className = fName;
    } else {
        canvas.className = "";
    }
}
Now we are able to apply or remove filters to the captured image or snapshot in our canvas element. We can also switch between various types of filters using the filter dropdown. The complete index.html, html5.webcam.demo.css and html5.webcam.demo.js files look like below:
The below HTML page has standard HTML5 Doctype apart from some additional meta tags. The meta tag indicate to the client browser that the latest standards need to be used to render the contents of the page. The tag is needed specifically for IE browser. We have included our CSS file in the head section and our JavaScript file towards the end of the page as well.
index.html
<!DOCTYPE html>
<html lang="en">
    <head>
        <meta charset="utf-8">
        <meta http-equiv="X-UA-Compatible" content="IE=edge">
        <meta name="viewport" content="width=device-width, initial-scale=1">
<!-- The above 3 meta tags *must* come first in the head; any other head content must come *after* these tags -->
        <title>WCG -- HTML5 Webcam Tutorial</title>
        <link rel="stylesheet" href="css/html5.webcam.demo.css" />
<!-- HTML5 shim and Respond.js for IE8 support of HTML5 elements and media queries -->
<!-- WARNING: Respond.js doesn't work if you view the page via file:// -->
<!--[if lt IE 9]>
    <script src="https://oss.maxcdn.com/html5shiv/3.7.3/html5shiv.min.js"></script>
    <script src="https://oss.maxcdn.com/respond/1.4.2/respond.min.js"></script>
<![endif]-->
    </head>
    <body>
        <h1>WCG -- HTML5 Webcam Tutorial</h1>

        <video height="480px" width="640px" id="webcamfeed" autoplay controls></video>
        <canvas height="480px" width="640px" id="snap"></canvas>
        <input type="button" id="capturewebcam" value="Start Webcam"/>
        <input type="button" id="takesnap" value="Take Snap"/>
        <input type="checkbox" id="enablefilters" >Enable Filters</input>
        <select id="filterName">
            <option value="blur">Blur</option>
            <option value="sepia">Sepia</option>
            <option value="grayscale">GrayScale</option>
            <option value="saturate">Saturate</option>
            <option value="brightness">Brightness</option>
        </select>
<!--Our script-->
        <script src="js/html5.webcam.demo.js"></script>

    </body>
</html>
In the below complete CSS file there are two additional classes targeting the video and the canvas elements. These classes set the height and width of the two elements and initial background colors of the two.
html5.webcam.demo.css
video{
    display: inline-block;
    background-color:grey;
    height: 480px;
    width: 640px;
}
canvas{
    display:inline-block;
    background-color: lightgray;
    height: 480px;
    width: 640px;
}
.blur{
    filter: blur(30px);
}
.grayscale{
    filter: grayscale(100%);
}
.sepia{
    filter: sepia(60%);
}
.saturate{
    filter: saturate(60%);
}
.brightness{
    filter: brightness(150%);
}
In the JavaScript file below you will notice the function getUserMedia which is needed to insulate our code from API changes. The WebRTC APIs are a work in progress and have varying levels of support in different browser versions. Some browser versions support prefixed API methods and in some newer browsers the method has moved to the Navigator object’s mediaDevices property.
html5.webcam.demo.js
var videoElement = document.getElementById("webcamfeed");
var captureWebcam = document.getElementById("capturewebcam");
var captureSnap = document.getElementById("takesnap");
var canvas = document.getElementById("snap");
var filters = document.getElementById("enablefilters");
var filterName = document.getElementById("filterName");
function getUserMedia(){
    if(navigator.getUserMedia){
        navigator.getUserMedia = navigator.getUserMedia || navigator.webkitGetUserMedia
        || navigator.mozGetUserMedia || navigator.msGetUserMedia;

    } else {
        navigator.getUserMedia = navigator.mediaDevices.getUserMedia;
    }
    return navigator.getUserMedia;
}
captureWebcam.addEventListener("click", function(){
    var media = getUserMedia();
    if(media){
        navigator.getUserMedia({video: { width: 640, height: 480}, audio: false}, function(stream){

            videoElement.src = window.URL.createObjectURL(stream);

        }, function(error){
        //Catch errors and print to the console
        console.log("There was an error in GetUserMedia!!!");
        console.log(error);
        });
    }
});
captureSnap.addEventListener("click", function(){
    var context = canvas.getContext('2d');
    context.drawImage(videoElement, 0, 0, 640, 480, 0, 0, 640, 480) ;
});
filters.addEventListener("change", function(evt){
    applyFilter(filterName.value);
});
filterName.addEventListener("change", function(evt){
    applyFilter(filterName.value);
});
function applyFilter(fName){
    if(filters.checked){
        canvas.className = fName;
    } else {
        canvas.className = "";
    }
}
7. Run the Project
To run the project run the following commands at the root of the project:
>npm install
and
>node index.js
and then navigate to the URL http://localhost:8090/index.html
8. Download the Source Code
That was an example for HTML5 Webcam.
You can download the full source code of this example here : WCG HTML5 Webcam Tutorial
