1. Introduction
In a previous example we talked about the transclusion concept, in terms of Angular directives.
1.1 What are Directives?
But, what are directives in Angular.js?
1.1.1 A definition
In general, directives is one of the reasons that Angular.js is famous today. They are essentially custom HTML tags and attributes that you can create to do anything one can imagine.
1.1.2 Official Definition
Directives are markers on a DOM element (attributes, CSS classes, names of elements, comments) that tell Angular’s HTML compiler to attach a specific behavior to that DOM element (i.e through event listeners), or even to transform the DOM element and its children. Some of the built-in Angular directives are: ngBind, ngModel and ngClass.
In addition to all the built-in Angular.js directives, you can also create your own directives, by using the .directive function.
Such directives look like this, on their html part:
index.html
<!DOCTYPE html>
<html>
<script src="http://ajax.googleapis.com/ajax/libs/angularjs/1.4.8/angular.min.js"></script>
<script src="second.js"></script>
<body ng-app="app">
    <div test-directive></div>
    Hello from page
</body>
</html>
whereas the javascript part is like:
second.js
var app = angular.module("app", []);
app.directive("testDirective", function() {
    return {
        restrict : "EA",
        template : "<h1>Hey, I'm the directive's content!</h1>"
    };
});
As expected, the output firstly contains the template inserted from the directive and then the actual html content of the page itself:

Did you notice the transition between the camel-case, used in the js part and the dash (“-“), when on html, according to the directive’s reference?
There are some points here, according to directives:
- A camel-case name must be used for naming a directive (js), but for invoking it (html), a dash (“-“) separated name must be used (i.e.
testDirective->test-directive). - The
restrictproperty is used to restrict the directive’s invocation by some of the existing methods. - The
templateproperty is used to define the html content that the specified directive will contain.
For instance, the legal restrict values are:
Efor element’s nameAfor attributeCfor classMfor comment
By default, the restrict property has a value of EA, which means that both element names and attribute names can invoke the directive.
In addition, here is the full list of all the possible attributes that one could use into a directive, along with their definitions:
restrict: Determines where a directive can be used.scope: Used to create a new child scope or an isolate scope.template: Declares the content that will be displayed from the directive; this, except from pure HTML, can always contain Angular features, too (i.e. data-binding expressions, other directives).templateUrl: Provides the path to the template that should used by the directive. Optionally, this could contain a DOM element id, when templates are defined in<script>tags.controller: The controller module that will be associated with the directive template.link: A function that is mainly used for DOM manipulation taskspriority: specifies the order in which directives are applied to the DOM. (Directives are compiled in priority order, from the highest to lowest. The default priority is “0”.)terminal: if set to true then the current priority will be the last
set of directives which will execute (any directives at the current priority will still execute as the order of
execution on same priority is undefined).require: require another directive and inject its controller as the fourth argument to the linking function.type: string representing the document type used by the markup.transclude: compile the content of the element and make it available to the directive.compile: deals with transforming the template DOM. (Since most directives do not do
template transformation, it is not used often.)
Returning back to our previous small example, what needs to be mentioned is that the directive is restricted to only be invoked either from elements or from attributes ( restrict : "EA" ), but there’s not a specific reason -for this example- to include the E parameter, as its template (HTML part of the directive) here used as an attribute and specifically, a div attribute (<div test-directive></div>). That is, the output would be the same as if we only used the A value ( restrict: 'A' ).
2. How to build Directives
2.1 General Concepts
In general, there are two ways a directive could be built. The one was depicted in the small example above is the Directive Definition Object (DDO), which is like the foundation of a directive. It tells Angular how the directive should be handled during the compilation cycle and what it should do. In technical terms, it is an object returned by the directive declaration that provides instructions to the compiler.
Specifically, the DDO is where you can set things such as how it is going to be marked up in the HTML, how its scope is going to interact with the outside world and if it is going to use the existing HTML or load new HTML into the directive’s content.
The controller function works just like controllers in the rest of your application. It is responsible for initializing the directive’s state and defining the functionality for it as well.
That was a brief introduction to several of the DDO aspects, also declared in the previous’ section relative list of attributes and is proposed for common, daily-usage of directives, which means that for more advanced concepts the above DDO concepts or even the example previously displayed, are not enough. Here come the $compile and $link functions.
2.2 The $compile and $link functions
If you are in the need of a more complex behavior inside your directive (=something that cannot be implemented with an HTML template), the $compile and $link functions come to the rescue. In general, these functions define how the directive is to modify the HTML markup that matched the directive.
The $compile function allows the directive to manipulate the DOM before it is compiled and linked thereby, allowing it to CRUD -if I may say- (ok, just kidding: add/change/remove) directives, as well as, add/change/remove other DOM elements. It is called once for each occurence of the directive in the HTML page. The $compile function finishes its execution, by returning the $link function.
The $link function is called every time the element is about to be bound to data in the $scope object. The concept is that you add the $compile function to the DDO and it has to return the $link function when executed.
In general, here is the standard format of that two:
directive.compile = function(element, attributes) {
    // One-time element configuration.

    var linkFunction = function($scope, element, atttributes) {
        // Bind element to data in $scope.
    }

    return linkFunction;
}
2.3 Link function Example
Before displaying a simple example of the $link function, what should be initially mentioned is the fact that there are many times that the $compile function is not necessary, as you don’t actually need it in your specific directive’s functionality. In that case, only the $link function could be used directly on the DDO.
Let’s now adjust the previous simple example to use the $link function, in order to replace the content of the template attribute, on runtime and specifically, when the template element is about to be bound to data in the $scope object:
index.html
<!DOCTYPE html>
<html>
<script src="http://ajax.googleapis.com/ajax/libs/angularjs/1.4.8/angular.min.js"></script>
<script src="app.js"></script>
<body ng-app="myApp">
    <div my-directive ng-controller="myController" >
</div>
</body>
</html>
And here is the angular’s part.
app.js
var myApp = angular.module("myApp", []);
myApp.directive('myDirective', function() {
var directive = {};
directive.restrict = 'A';
template : "Hey, I'm the directive's content, but I won't be displayed!
"
directive.link = function($scope, element, attributes) {
element.html("This is the new content, overridden from the $link function: " + $scope.content);
element.css("background-color", "#cccccc");
}
return directive;
})
myApp.controller("myController", function($scope, $http) {
$scope.content = "I'm the directive's updated content!";
});
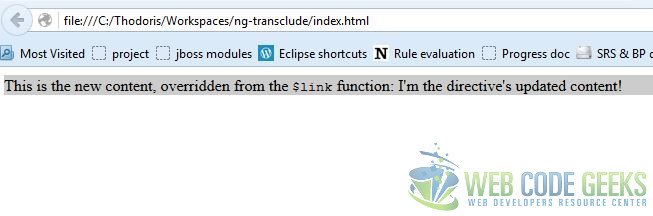
As previously mentioned, I just went only for the attribute (A) restriction here, as line 5 shows. In line 6, we have the common content of the directive’s template, which will not actually be displayed to the end-user, as when the element is about to be bound to data in the $scope object, the $link function will be called and replace the template’s content (line 9), with the content set in the controller (line 18).
As expected and also explained from the above, here is the output:
3. Download the source code
This was an example of Angular.js Custom Directives.
You can download the full source code of this example here: ng-custom-directives.zip

Nice example. Thanks you.