In this article, we’re going to have a closer look at the Ionic Framework, which is a modern WEB-based platform for building mobile apps. That means you don’t need to have any knowledge about the mobile platforms to build real apps.
Ionic is a full platform which evolved from a simple UI library. It’s a complete gateway for a web developer into the mobile world. It is still a UI framework and a very good one. It’s also a set of abstractions on top of the Cordova, which provides JavaScript bindings for the native functions. In the heart of it is a well-known web framework Angular with TypeScript.
Ionic will run your code in a webview (a simple browser) with the help of some native bindings. Note how this is different from React Native, which will actually transpile the web code into the native components.
As we’re getting familiar with Ionic, we’re going to make something very practical. We’re going to build a mobile app — one that solves a real problem. The idea behind it comes from the very real problem I’ve been suffering from for several years. Namely the groceries list. My wife sends me a list of things I need to buy in an SMS, which is usually quite long. And so you can imagine, it’s hard to keep track of what is already in the shopping basket and what’s not.
So let’s build an app that will read the SMS and make a nice To Do list with checkboxes from it.
The complete code can be found on GitHub. In case there are problems, please refer to the source code.
Prerequisites
You probably already have the Node and the npm package manager. You’ll also want to install Android Studio which comes with an Android SDK. We will need it to build our app for Android and run it on the emulator or a real device.
Getting Started
Alright, first off, open the terminal and install the ionic client.
npm i -g ionic
You can also add a handy alias into your shell config file.
alias i=ionic
When creating a new project, you can specify a template to build from. For the sake of this tutorial, we’ll start with the blank.
ionic start sms-shop blank
cd sms-shop
Ionic will create a new project, install all the dependencies, and then you’ll be able to run it.
ionic serve
You should see your blank app in the browser now. That is how you’re supposed to develop your app. Every time you make a change, the browser will refresh, and you will see the change on the screen. It’s pretty handy to have a separate monitor with the browser always in sight.
Sometimes, you will want to run your app on a real device or an emulator (because Cordova plugins won’t work in a browser).
ionic cordova run android --device
ionic cordova run android --emulator
The downside is that every time you alter an app, you have to re-run it to see the changes. Unfortunately, this is the only way we can test the native functions.
Here’s the plan…
OK, let’s talk about what we are going to do.
We will need three pages. The first one to display all the lists we have (we already have the HomePage), the second one to select an SMS to build a list from (SelectPage), and the last one is the page for a specific groceries list where you can check/uncheck items (ListPage).
What would a groceries list look like? It will have an id, date of creation and the list of items. Each item will have a title and a boolean flag “done.” As you already know, Ionic is built on top of the Angular with the TypeScript support. So let’s define our groceries list type. Create a new file src/app/types.ts:
export type GLIST = {
  id: string,
  created: string,
  items: Array< { title: string, done: boolean }>
}
Our app will also need some storage to store the lists and the items. For that, we’ll use the Ionic Storage module. Ionic Storage lets us store data as key-values, and underneath it, will use a storage engine, which is the most suitable for a specific platform.
To make the storage available, we’ll need to register it as an import. In the src/app/app.module.ts file, let’s import storage, and put it into the imports section:
import { IonicStorageModule } from '@ionic/storage';
// ...
 imports: [
    BrowserModule,
    IonicModule.forRoot(MyApp),
    IonicStorageModule.forRoot()
  ],
// ...
OK, now we’re all set to actually start making things.
Home view
Let’s start with the home view. Here we’re going to display all the groceries lists and a button that will allow us to create a new list from an SMS. Open home.html and replace its content with the following:
<ion -header>
  </ion><ion -navbar>
    </ion><ion -title>SMS Groceries</ion>

<ion -content padding>
  <p text-center>
    <button ion-button (click)="selectSms()">Select SMS</button>
  </p>

  </ion><ion -list>
    </ion><ion -item *ngFor="let list of lists" (click)="go(list.id)">

      {{ listTitle(list) }}
      <span item-end style='color: #aaa;'>{{ list.created }}</span>
In this view, ion-header and ion-list are examples of ionic UI components. For a full list of available components, you can refer to the documentation.
The most interesting part here is:
<ion -item *ngFor="let list of lists" (click)="go(list.id)">
    {{ listTitle(list) }}
    <span item-end style='color: #aaa;'>{{ list.created }}</span>
  </ion>
If you’re not familiar with Angular, here’s a quick overview:
ngFor="let list of lists"– is a common directive for iterating a list in Angular.(click)="go(list.id)"– this is how you bind a click event. In this case we want to navigate to the list view{{ listTitle(list) }}– every time you want to output a value you put it into double curvy bracesion-item, item-end– those are UI components that Ionic prepared for us to use.
OK, I hope this part is clear, now let’s do the component. Copy and paste this into home.ts:
import { Component } from "@angular/core"
import { NavController } from "ionic-angular"
import { Storage } from "@ionic/storage"

import { SelectPage } from "../select/select"
import { ListPage } from "../list/list"
import { GLIST } from "../../app/types"

@Component({
  selector: "page-home",
  templateUrl: "home.html"
})
export class HomePage {
  lists: Array<glist>  // define our lists, which is an array of GLISTs

  constructor(
    public navCtrl: NavController,  // navCtrl is used for navigation between pages
    private storage: Storage        // storage to be used for... well storing our data
  ) {}

  // this is part of Ionic lifecycle; it will be called every time before navigating this page
  ionViewWillEnter() {
    // we're loading all the lists that we have from the storage
    const lists = []
    this.storage.forEach((list, id) => {
      lists.push(JSON.parse(list))
      console.log(this.lists)
    }).then(() => {
      this.lists = lists
    })
  }

  selectSms() {
    this.navCtrl.push(SelectPage, {})  // this is how we change the page
  }

  listTitle(list) {
    return list.items.map(x => x.title).join(", ")
  }

  go(id) {
    this.navCtrl.push(ListPage, {id})  // another example of changing the page,
                                       // this time with a parameter
  }
}</glist>
Now, this might feel a little overwhelming, so let’s break this code down piece by piece.
First of all, in Angular when you want to use a component, you are using dependency injection. Basically, you’re not creating the components yourself, but rather declaring which ones you need and letting the engine figure out the details. In the example above, this is how we inject navCtrl and storage. Angular will create them for us and put on this.
The ionViewWillEnter is part of the Ionic page lifecycle. This method runs just before the page is to become active. This is usually the place where you want to load your data. This is what we are doing here by loading all of our lists from the storage.
You’ve probably noticed that storage works asynchronously. Instead of returning a value, it returns a promise. The same goes for the forEach method we’re using here.
Finally, when we want to navigate to another page, we use the navCtrl which works like a simple stack. It has a push method we need to call whenever we want the view to change. It can also accept the params, which can be retrieved on the next page (we’ll talk about this later).
At this point, the compiler will fail because we still haven’t defined the other two pages SelectPage and ListPage. So let’s write them.
Reading the SMSes
A couple of words about Ionic Native. Loosely speaking, this is a set of JavaScript bindings for some native behavior. It allows you to use some of the native phone functions (for example camera) from JavaScript. Underneath it is powered by Cordova, but I think nowadays you can even swap it to Xamarin which is owned by Microsoft.
The list of Native’s features is astonishingly long. You can skim through the whole list here.
Some of those plugins can be used on both platforms iOS, and Android, while others are platform-specific.
Our task here is to read the list of SMSes and let the users select the SMS they want. I have to say that iOS doesn’t have an ability to read SMSes (at least not that I’m aware of, please let me know otherwise). So from this point onwards, we’re going Android-only.
Let’s start by using a permissions module. It allows us to ask for a particular permission at any point of the code (this is how the modern Android permission system works).
ionic cordova plugin add cordova-plugin-android-permissions
npm install --save @ionic-native/android-permissions
Then, in the app.module.ts add to the providers section:
import { AndroidPermissions} from '@ionic-native/android-permissions';
// ...
  providers: [
    StatusBar,
    SplashScreen,
    {provide: ErrorHandler, useClass: IonicErrorHandler},
    AndroidPermissions  // < = this change
  ]
We will also need the Cordova plugin for reading the SMSes:
ionic cordova plugin add cordova-plugin-sms
Now let’s create the SelectPage. This time let’s start with the component itself:
// app/pages/select/select.ts

import { Component } from "@angular/core"
import { NavController, Platform } from "ionic-angular"
import { AndroidPermissions } from "@ionic-native/android-permissions"
import { ListPage } from "../list/list"
import { Storage } from "@ionic/storage"

import { GLIST } from "../../app/types"

declare var SMS: any  // making TypeScript happy. Otherwise, we could use `window.SMS`

@Component({
  selector: "page-select",
  templateUrl: "select.html"
})
export class SelectPage {
  messages: Array<any>  // Our messages definition

  constructor(
    public navCtrl: NavController,
    public androidPermissions: AndroidPermissions,  // a component for requesting permissions
    public platform: Platform,
    private storage: Storage,
  ) {
    this.messages = []
  }

  select(m) {
    const id = m.date + ""
    const list: GLIST = {
      id,
      created: formatDate(new Date()),
      items: m.body.split(",").map(s => {
        return {
          title: s.trim(),
          done: false,
        }
      })
    }
    this.storage.set(id, JSON.stringify(list))
    this.navCtrl.push(ListPage, { id })
  }

  loadMessages() {
    this.platform.ready().then(readySource => {
      SMS.listSMS(
        { box: "inbox", indexFrom: 0, maxCount: 50 },
        messages => {
          console.log("Sms", messages)
          this.messages = messages
        },
        err => console.log("error listing smses: " + err)
      )
    })
  }

  ionViewWillEnter() {
    const READ_SMS = this.androidPermissions.PERMISSION.READ_SMS
    this.androidPermissions.checkPermission(READ_SMS).then(
      success => {
        console.log("Permission granted")
        this.loadMessages()
      },
      err => this.androidPermissions.requestPermission(READ_SMS)
    )

    this.androidPermissions.requestPermissions([READ_SMS])
  }
}

// A simple formatter for dates, i.e. "4 Feb"
function formatDate(date) {
  var monthNames = [
    "Jan", "Feb", "Mar", "Apr",
    "May", "Jun", "Jul", "Aug",
    "Sep", "Oct", "Nov", "Dec"
  ]

  var day = date.getDate();
  var monthIndex = date.getMonth();

  return day + ' ' + monthNames[monthIndex];
}</any>
Let’s start with the method:
ionViewWillEnter() {
    const READ_SMS = this.androidPermissions.PERMISSION.READ_SMS
    this.androidPermissions.checkPermission(READ_SMS).then(
      success => {
        console.log("Permission granted")
        this.loadMessages()
      },
      err => this.androidPermissions.requestPermission(READ_SMS)
    )
    this.androidPermissions.requestPermissions([READ_SMS])
  }
You already know this method runs every time a view is about to enter. Here, we’re using the permission component that will trigger a standard Android permission dialog asking if we can read the SMSes. And if we have the permission, then it will load the messages:
loadMessages() {
    this.platform.ready().then(readySource => {
      SMS.listSMS(
        { box: "inbox", indexFrom: 0, maxCount: 50 },
        messages => {
          console.log("Sms", messages)
          this.messages = messages
        },
        err => console.log("error listing smses: " + err)
      )
    })
  }
Here, we’re using the SMS module and one of its methods called listSMS. By the way, here you can read about others. So, we read the first 50 SMSes and put them on this so that we can iterate them in the view.
Then we also have the select method:
select(m) {
    const id = m.date + ""
    const list: GLIST = {
      id,
      created: formatDate(new Date()),
      items: m.body.split(",").map(s => {
        return {
          title: s.trim(),
          done: false,
        }
      })
    }
    this.storage.set(id, JSON.stringify(list))
    this.navCtrl.push(ListPage, { id })
  }
It takes the SMS body, then it prepares the items list by splitting it with commas, puts it into the storage this.storage.set(id, JSON.stringify(list)) and navigates to the list page, which we still need to write.
And, finally the html view (src/pages/select/select.html) should already be understandable:
<ion -header>
  </ion><ion -navbar>
    </ion><ion -title>SMS Groceries</ion>


<ion -content padding>

  <h1>Select the SMS</h1>

  </ion><ion -list>
    <button ion-item *ngFor="let m of messages" (click)="select(m)">
      {{ m.body }}
    </button>
  </ion>
List Page
Just one little step left. Let’s finally write the ListPage.
import { Component } from "@angular/core"
import { NavController, NavParams } from "ionic-angular"
import { Storage } from "@ionic/storage"

import { GLIST } from "../../app/types"

@Component({
  selector: "page-list",
  templateUrl: "list.html"
})
export class ListPage {
  list: GLIST

  constructor(
    public navCtrl: NavController,
    public navParams: NavParams,
    private storage: Storage,
  ) {
  }

  ionViewWillEnter() {
    const id = this.navParams.get("id")  // retrieving the param, in this case, list id
    this.storage.get(id).then(list => {  // loading the list from the storage
      if (list) {
        this.list = JSON.parse(list)
      } else {
        console.log("NO LIST?!?!")
      }
    })
  }

  doneCount() {
    return this.doneItems().length
  }

  allCount() {
    if (!this.list) return 0
    return this.list.items.length
  }

  toggle(item) {
    item.done = !item.done
    this.storage.set(this.list.id, JSON.stringify(this.list))
  }

  toBeDoneItems() {
    if (!this.list) return []
    return this.list.items.filter(x => !x.done)
  }

  doneItems() {
    if (!this.list) return []
    return this.list.items.filter(x => x.done)
  }
}
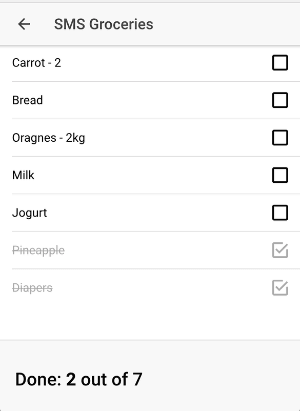
By this point, all of this should be familiar. Let’s have a look at the HTML view:
<ion -header>
  </ion><ion -navbar>
    </ion><ion -title>SMS Groceries</ion>


<ion -content>
  </ion><ion -list>

    </ion><ion -item *ngFor="let item of toBeDoneItems()" (click)="toggle(item)">
      <span *ngIf="!item.done">{{ item.title }}</span>
      </ion><ion -icon name="square-outline" item-end *ngIf="!item.done"></ion>


    <ion -item *ngFor="let item of doneItems()" (click)="toggle(item)">
      <span *ngIf="item.done" style="text-decoration: line-through; color: #aaa;">{{ item.title }}</span>
      </ion><ion -icon name="checkbox-outline" item-end *ngIf="item.done" style='color: #aaa;'></ion>


<ion -footer>
  </ion><ion -toolbar>
    <h2 padding>Done: <b>{{ doneCount() }}</b> out of {{ allCount() }}</h2>
  </ion>
Running
Let’s finally try to run our app with simple command (connect your Android device first):
i cordova run android --device
Conclusion
Look, Ma!
In this article we became familiar with Ionic Framework, got a grasp of Angular and Typescript, with dependency injection and rather peculiar HTML markup, and learned how to use native functions from our web app with the help of Cordova and Ionic Native.
But what’s more important…
In a matter of hours, with zero knowledge about mobile development, we were able to build a functioning application that uses native features and actually solves a real problem.
It’s the beauty and power of the Ionic Framework.
I strongly encourage you to give it a try and build something useful (a side-project?), put it in the store and even try to get some money.
Good luck and have fun.
P.S.: Please let me know about any questions you have or if you need advice. I’ll be happy to help. My twitter is @janis_t.
| Published on Web Code Geeks with permission by Yanis Triandaphilov, partner at our WCG program. See the original article here: Build an SMS Groceries App with Ionic and Angular
Opinions expressed by Web Code Geeks contributors are their own. |
