Developing Front-End Microservices With Polymer Web Components And Test-Driven Development (Part 1/5): The First Component
In this article series we’ll go through Web Components development in context of microservices. We’ll use Polymer as the library that will help us out. The objective is to create a microservice that will handle full functionality. The service will contain not only back-end API (as is the case with most microservices) but also front-end in form of Web Components. Later on, when the time comes to use the service we’re creating, we’ll simply import Web Components.
That is quite a different approach than what you might be used to. We won’t create a Web Application that calls APIs handled by microservices. We’ll import parts of the front-end from microservices. Our objective is to have a microservice that contains everything; from front-end to back-end. Please refer to the Including Front-End Web Components Into Microservices article for more information that lead to this decision.
I am a huge fan of Test-Driven Development so we’ll write all the code using test first approach. We’ll write a test, run all tests and confirm that the last one fails, write implementation, run all tests and confirm that all passed. Tests will act as executable specifications. We’ll use them to define what should be implemented. If you are new to TDD and the concept of executable documentation, please read the article Tests As Documentation.
This article is part of Developing Front-End Microservices With Polymer Web Components And Test-Driven Development series:
- The First Component
- Polishing The First Component
- The Second Component
- Styling And Communication
- Using Microservices
Since the objective is to focus on front-end part of the service we’ll be working on, repository with fully operational back-end is already available.
Back-End Server
The code in the books-service repository already contains a Web server. We’ll use it to respond to REST API requests from our Web Components as well as to serve static files that we’ll be creating throughout this exercise.
Assuming that Git is installed, please clone the books-service repository. For now, we’ll use polymer-init branch that has the full back-end and only the bare minimum we’ll need to start working with Polymer. If you have trouble following the exercises, the complete source code can be found in the polymer-book-form branch of the books-service repository.
1 2 | git clone -b polymer-init https://github.com/vfarcic/books-service.gitcd books-service |
The back-end part of the service runs on Scala and SBT with Spray as the API framework. Don’t worry if you are new to Scala. This article is only about JavaScript, Polymer, Test-Driven Development and Microservices. We will not even touch Scala code. However, since we need a back-end and this one was already available, we’ll simply use it to respond to HTTP requests that our Web Components will be making. Since the server is already there, we’ll also use it to serve static files that we are about to start working on.
Examples in this article series will require Docker and Docker Compose to be installed on your system. In you have trouble installing Docker Compose, I prepared a Vagrant VM with everything installed and ready to be used. Personally, I prefer running my own VM through Vagrant than using Boot2Docker. Behind the scenes, Boot2Docker is a wrapper around Vagrant anyways. Please execute commands that follow if you want to run examples through VirtualBox and Vagrant.
1 2 3 | vagrant up devfevagrant ssh devfecd /vagrant |
The command to run the container with the back-end server and front-end tests watcher is as follows.
1 2 | sudo docker-compose up -d feTestsWatchsudo docker-compose logs feTestsWatch |
The above commands run Docker container vfarcic/books-service-tests as daemon (background process) and output logs 1. It contains everything we need (Java, Scala, SBT, NodeJS, Gulp, Bower, browsers, etc.) with all dependencies (SBT and NPM) pre-downloaded. It mounts few volumes; /root/ivy2/cache is mounted with dependencies that were downloaded with the first command and /source contains all the source code together with NPM and Bower dependencies. We’re also exposing the port server is running on (8080).
TEST_TYPE is the environment variable that is used to decide what type of tests should be run. In this case, we’re running client side tests continuously with gulp. The server and MongoDB is run in the background. The container’s size is over 2GB (only NodeJS modules are around 0.5GB) so it might take a while until it is pulled from the registry. Please be patient. All subsequent runs will be fast.
For more information, please take a look at the Dockerfile.test and docker-compose.yml.
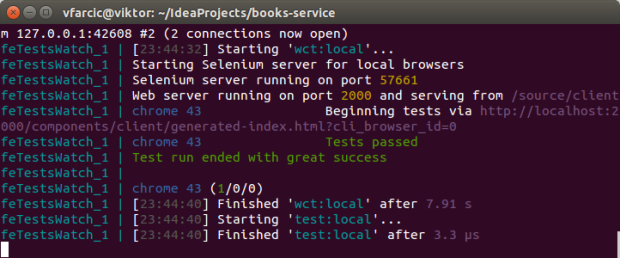
The output should be similar to the following.
With back-end up and running and tests being executed every time we change client-side source code, we’re ready to start developing the front-end with Polymer. Docker container that we just run contains both Chrome and FireFox. In the future we could add more browsers to the container but, for now, those two should suffice. However, in order to be able to receive feedback from tests fast, only Chrome will be used. Later on when, for example, we plugin these tests to our Continuous Integration tool, we should enable more browsers. This can be accomplished by modifying client/wct.conf.js file.
Next step is to discuss high-level requirements.
Defining High-Level Requirements
The idea is to build an online shop. Since we are using microservices, each domain of the application will have its own service. In this article we’ll be working on Web Components parts of the service dedicated to listing and administration of books. The other parts of the application (authentication, shopping cart, etc) would be developed as separate microservices.
Now that we have a high level overview, let’s define what will be our first Polymer Web Component. We’ll develop a form that will allow us to insert, update or delete a book. This component will perform all those actions by calling the back-end part of the same service. As said before, to make things easier, back-end is already developed.
There should be four fields (ID, Title, Author and Description) and two buttons (Delete and Submit).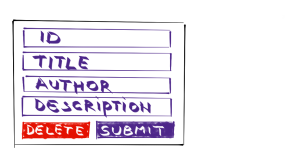
Now that we are all set, let’s walk through the testing setup.
Testing Setup
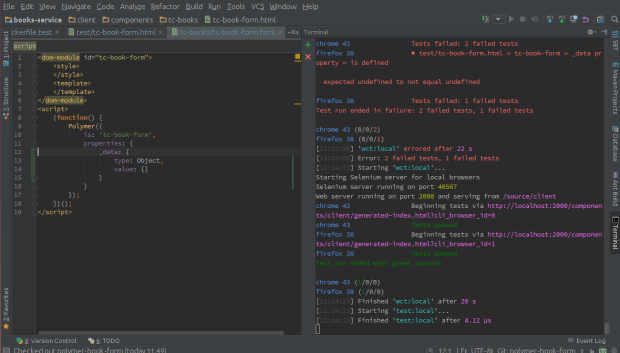
Open both client/test/tc-book-form.html and client/components/tc-books/tc-book-form.html source files. The first one will contain tests while we’ll write implementation of those tests in the second.
First we’ll write a test (and save changes). Docker container that we run earlier will detect changes and run all front-end tests. Since at this point we didn’t write the implementation, the test will fail. Confirming failure is important since we want to avoid creating false positive tests; those that are passing no matter the state of the implementation code. From there on we’ll write implementation of the test (and save changes).
As before, container will detect changes and run tests again. This time, if the implementation is correct, all tests should pass. At this point we’ll refactor the code if we feel that such an action is needed. Since we have the safety net in form of tests, refactoring will be a (reasonably) safe thing to do. This cycle is called red-green-refactor and we’ll repeat it until the Polymer component is finished and working as we expect it to.
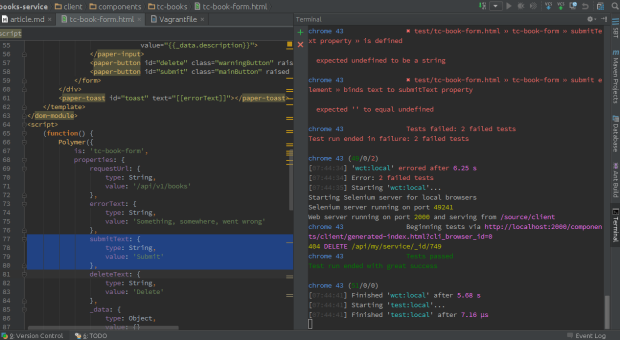
I tend to split my screen into two windows side by side. On one is the code (tests or implementation) and the other one is the console output from tests. That way I receive constant feedback from tests without switching between windows.
The client/test/tc-book-form.html already contains all the prerequisites. Among other things, it has imports of all Polymer components that we’ll use. We’ll get into each of them soon.
If, at any moment during the exercises provided below you feel the need to see the result, please open http://localhost:8080/components/tc-books/demo/index.html in your favorite browser. While there is no real reason to do that often when developing using TDD, less experienced practitioners find it useful to manually confirm their work. Since automated tests are validating the code, manually opening the page to see the result serves only as validation that what we did provides correct visual result.
The tag test-fixture is a handy way to declare a fixture (component) that we’ll be testing.
1 2 3 4 5 | <test-fixture id="fixture"> <template> <tc-book-form></tc-book-form> </template></test-fixture> |
Finally, tests look like following.
01 02 03 04 05 06 07 08 09 10 11 12 13 | describe('tc-book-form', function() { var myEl; before(function() { myEl = fixture('fixture'); }); it('false test', function() { assert.isTrue(true); });}); |
describe is a way to organize tests and serves no other purpose than to group similar tests together. The before function is run before all tests inside the block it is defined in. In this case, we are instantiating a new fixture (tc-book-form) and assigning it to the variable myEl.
At the moment we have only one (fake) test. It is defined with function it.
Since tests are divided into different files, client/test/index.html is used as a holder where we can specify which suites to run.
1 2 3 4 | WCT.loadSuites([ 'tc-book-form.html', 'tc-books.html']); |
Please explore the source code that we cloned previously for more details. Once you are done we can start writing the first set of tests and their implementation.
Specifying Data Model
We need a property that we’ll use to store the data that we’ll collect through the form we are about to implement. In Polymer, declared properties are defined inside the properties object. I tend to declare both public and private properties inside the properties object and use _ prefix to indicate that something is private.
With that in mind, our first test could like like this.
[client/test/tc-book-form.html]
1 2 3 4 5 6 7 8 | describe('_data property', function() { it('is defined', function() { assert.isDefined(myEl._data); assert.isObject(myEl._data); });}); |
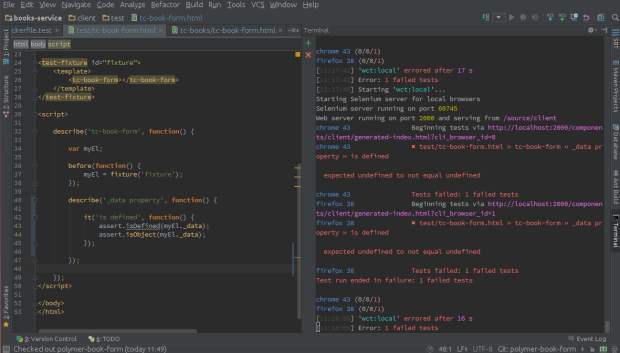
We are specifying that _data should be defined and is an object. As soon the client/test/tc-book-form.html file is saved with this change, Docker will rerun the tests and you’ll see that there is one failure.
The implementation is simple. Actually, when using TDD approach, changes are so small that it is almost always easy to implement a failed test.
[client/components/tc-books/tc-book-form.html]
01 02 03 04 05 06 07 08 09 10 11 12 13 | <script> (function() { Polymer({ is: 'tc-book-form', properties: { _data: { type: Object, value: {} } } }); })();</script> |
As before, as soon as the file client/components/tc-books/tc-book-form.html was saved, Docker rerun all the tests. This time, they are all successful.
Input Elements Specifications
Since one of this component’s primary functions is to add and update a book, we should define input elements. Back-end expects a request with following JSON keys: _id, title, author and description. Polymer has a very useful component called paper-input that will provide all the features we might need for our form fields.
With Polymer, all DOM elements should be defined inside template tags. More information can be found in Polymer Feature Overview.
Let’s start with the _id input field. To begin with, it should be defined within our component. Polymer allows us to select any element with $.
[client/test/tc-book-form.html]
1 2 3 4 5 6 7 | describe('_id element', function() { it('is defined', function() { assert.isDefined(myEl.$._id); });}); |
From now on I’ll assume that you got used to writing a test, seeing it fail and only then writing the implementation.
[client/components/tc-books/tc-book-form.html]
1 2 3 | <template> <paper-input id="_id"></paper-input></template> |
For those not used to Test-Driven Development, steps we’re making might be too small. However, with a bit of practice, having such small steps speeds up our development. Experienced TDD practitioners spend seconds between test and implementation and are able to work fast due to the confidence provided by tests. You’ll notice that we won’t look at the component from browser for quite some time. With tests in place, there is very little need to open a browser manually. Unfortunately, running tests in browser is relatively slow.
While in some other case it should take only a few seconds to run all tests, opening browser is a costly operation and running our tests can take 5 or more seconds. That might sounds like very fast but the reality is that it is counter-productive to wait that long before switching from test to implementation code and vice versa. With some other framework we could would overcome this limitation by using PhantomJS as a browser since it runs much faster than, for example, Chrome. However, Polymer uses advanced browser features that are not available in PhantomJS.
From now on, for brevity, I’ll present all tests and implementation code related to an element or a function at once. However, you should write one test at a time, followed with implementation of only that test and optional refactoring.
Our _id element, besides being defined, should have few more attributes and features. Specifications that define them are following.
[client/test/tc-book-form.html]
01 02 03 04 05 06 07 08 09 10 11 12 13 14 15 16 17 18 19 20 21 22 23 24 25 26 27 28 29 30 31 32 33 34 35 36 37 | it('sets label', function() { assert.equal(myEl.$._id.label, 'ID'); }); it('binds to _data._id property', function() { myEl._data = {_id: 123}; assert.equal(myEl.$._id.value, myEl._data._id); }); it('sets auto-validate', function() { assert.isTrue(myEl.$._id.autoValidate); }); it('accepts only numbers', function() { myEl.$._id.value = 'this is not a number'; assert.isFalse(myEl.$._id.validate()); }); it('does not accept leading 0', function() { myEl.$._id.value = '0123'; assert.isFalse(myEl.$._id.validate()); }); it('is required', function() { myEl.$._id.value = ''; assert.isFalse(myEl.$._id.validate()); }); it('sets error message', function() { assert.equal(myEl.$._id.errorMessage, 'Must be a number'); });}); |
Understanding what is expected from this element to do should be easy by reading test descriptions. In this aspect, tests act as executable documentation.
The implementation of all those tests is following.
[client/components/tc-books/tc-book-form.html]
01 02 03 04 05 06 07 08 09 10 | <template> <paper-input id="_id" label="ID" value="{{_data._id}}" auto-validate pattern="[1-9][0-9]*" required error-message="Must be a number"> </paper-input></template> |
Values inside {{ and }} indicate a two-way binding. In the example above, whenever value of the property _data._id changes, _id element value will change as well. Same is true the other way around. Change to the _id element value will trigger the change to the _data._id property. Alternative is one-way binding that is set using square brackets ([[ and ]]).
We should define the rest of the fields in a similar manner as _id.
[client/test/tc-book-form.html]
01 02 03 04 05 06 07 08 09 10 11 12 13 14 15 16 17 18 19 20 21 22 23 24 25 26 27 28 29 30 31 32 33 34 35 36 37 38 39 40 41 42 43 44 45 46 47 48 49 50 51 52 53 54 55 56 57 58 59 60 61 62 63 64 65 66 67 68 69 70 71 72 73 74 75 | describe('title element', function() { it('is defined', function() { assert.isDefined(myEl.$.title); }); it('sets label', function() { assert.equal(myEl.$.title.label, 'Title'); }); it('binds to _data.title property', function() { myEl._data = {title: 'Title of the book'}; assert.equal(myEl.$.title.value, myEl._data.title); }); it('sets auto-validate', function() { assert.isTrue(myEl.$.title.autoValidate); }); it('is required', function() { myEl.$.title.value = ''; assert.isFalse(myEl.$.title.validate()); }); it('sets error message', function() { assert.equal(myEl.$.title.errorMessage, 'Title is required'); });});describe('author element', function() { it('is defined', function() { assert.isDefined(myEl.$.author); }); it('sets label', function() { assert.equal(myEl.$.author.label, 'Author'); }); it('binds to _data.author property', function() { myEl._data = {author: 'Book Author'}; assert.equal(myEl.$.author.value, myEl._data.author); }); it('sets auto-validate', function() { assert.isTrue(myEl.$.author.autoValidate); }); it('sets error message', function() { assert.equal(myEl.$.author.errorMessage, 'Author is required'); });});describe('description element', function() { it('is defined', function() { assert.isDefined(myEl.$.description); }); it('sets label', function() { assert.equal(myEl.$.description.label, 'Description'); }); it('binds to _data.description property', function() { myEl._data = {description: 'Book description'}; assert.equal(myEl.$.description.value, myEl._data.description); });}); |
The implementation of those fields should be fairly simple with the experience we got by coding the first one.
[client/components/tc-books/tc-book-form.html]
01 02 03 04 05 06 07 08 09 10 11 12 13 14 15 16 17 18 | <paper-input id="title" label="Title" value="{{_data.title}}" auto-validate required error-message="Title is required"></paper-input><paper-input id="author" label="Author" value="{{_data.author}}" auto-validate required error-message="Author is required"></paper-input><paper-input id="description" label="Description" value="{{_data.description}}"></paper-input> |
Now that we have all the fields and validation defined and implemented, let us work on a code that will send a request to add or update a book to the back-end.
PUT Request Specifications
Back-end expects us to send a PUT request to the URL /api/v1/books. The request body should contain the JSON with all the fields.
Polymer has iron-ajax component that can help us with this task. As before, we’ll specify what we need through tests.
Before we start working with iron-ajax, let us define a requestUrl property. We’ll bind it to iron-ajax so that users of our component have the option to change the URL of the service if such a need arise.
[client/test/tc-book-form.html]
1 2 3 4 5 6 7 8 9 | describe('requestUrl', function() { it('is defined', function() { assert.isDefined(myEl.requestUrl); assert.isString(myEl.requestUrl); assert.equal(myEl.requestUrl, '/api/v1/books'); });}); |
The implementation is following.
[client/components/tc-books/tc-book-form.html]
1 2 3 4 5 6 7 | properties: { requestUrl: { type: String, value: '/api/v1/books' }, ...} |
With the property defined, we can start working on the iron-ajax that we’ll use to sent POST requests to our back-end.
Specifications are following.
[client/test/tc-book-form.html]
01 02 03 04 05 06 07 08 09 10 11 12 13 14 15 16 17 18 19 20 21 | describe('putAjax element', function() { it('is defined', function() { assert.isDefined(myEl.$.putAjax); }); it('sets method to PUT', function() { assert.equal(myEl.$.putAjax.method, 'PUT'); }); it('sets content-type', function() { assert.equal(myEl.$.putAjax.contentType, 'application/json'); }); it('binds url to requestUrl property', function() { myEl.requestUrl = '/api/my/service'; assert.equal(myEl.$.putAjax.url, myEl.requestUrl); });}); |
The implementation of the specifications we wrote above is following.
[client/components/tc-books/tc-book-form.html]
1 2 3 4 5 | <iron-ajax id="putAjax" method="PUT" content-type="application/json" url="[[requestUrl]]"></iron-ajax> |
Now that we have a way to sent a PUT request to the back-end server, we should create a function that validates data from the input fields, puts it to the putAjax body and initiates generation of the request.
Submit Function Specifications
In order to validate data easily, we should wrap all our fields into an HTML form element.
[client/test/tc-book-form.html]
1 2 3 4 5 6 7 | describe('form element', function() { it('is defined', function() { assert.isDefined(myEl.$.form); });}); |
Implementation is a simple HTML tag around our input fields.
[client/components/tc-books/tc-book-form.html]
01 02 03 04 05 06 07 08 09 10 11 | <form id="form"> <paper-input id="_id" label="ID" value="{{_data._id}}" auto-validate pattern="[1-9][0-9]*" required error-message="Must be a number"> </paper-input>...</form> |
Now we are ready to start working on the submit function. Specifications that are defined below are a bit more complex than those we wrote before. You’ll find comments above each function that requires further explanation.
[client/test/tc-book-form.html]
01 02 03 04 05 06 07 08 09 10 11 12 13 14 15 16 17 18 19 20 21 22 23 24 25 26 27 28 29 30 31 32 33 34 35 36 37 38 39 40 41 42 43 44 45 46 47 48 49 50 51 52 53 | describe('_submit function', function() { var el; // This function will run the code before each test // defined inside this scope. In it, we are defining // a mock object. We want, by default, form element's // checkValidity function to always return true. // There is another mock in it that substitutes the // putAjax function generateRequest. We don't want // tests to fire real requests and this mock will make // sure that such a thing does not happen. We're using // sinon library to create mock objects. beforeEach(function() { el = fixture('fixture'); el.$.form.checkValidity = sinon.mock().returns(true); el.$.putAjax.generateRequest = sinon.mock(); }); // Polymer binds input fields values as strings so this // test makes sure that we do the necessary transformation // of the _id value since back-end expects it to be a number. it('sets _data property to putAjax.body', function() { // Should be with _id as number var expected = JSON.stringify({_id: 123, title: "Book Title", description: ""}); // _data stores _id as string el._data = {_id: "123", title: "Book Title", description: ""}; el._submit(); assert.equal(el.$.putAjax.body, expected); }); // When _submit function is called, we should make sure // that putAjax.generateRequest is called. In the beforeEach // function we already create a mock out of this function // and here we are simply validating that it is called once. it('calls putAjax.generateRequest', function() { el._submit(); sinon.assert.calledOnce(el.$.putAjax.generateRequest); }); it('calls _handleError when form is invalid', function() { el._handleError = sinon.mock(); el.$.form.checkValidity = sinon.mock().returns(false); el._submit(); sinon.assert.calledWith(el._handleError, 'At least one field is invalid.'); });}); |
The implementation of the _submit function is still relatively simple.
[client/components/tc-books/tc-book-form.html]
01 02 03 04 05 06 07 08 09 10 11 12 | _submit: function() { if (this.$.form.checkValidity()) { // This is a workaround. // _id should be sent as number this.set('_data._id', parseInt(this._data._id)); // iron-ajax does not stringify object this.$.putAjax.body = JSON.stringify(this._data); this.$.putAjax.generateRequest(); } else { this._handleError('At least one field is invalid.'); }} |
You might have noticed that we are calling the _handleError function even though it does not exist. Tests had it mocked so they were all successful. Let’s implement error handling.
Error Handling Specification
Polymer has a useful element called paper-toast that can be used to provide visual notifications.
We’ll start with specification of the errorText property. Later on we’ll bind it to our paper-toast element. That way users of our component will be able to change error message.
[client/test/tc-book-form.html]
1 2 3 4 5 6 7 8 9 | describe('errorText property', function() { it('is defined', function() { assert.isDefined(myEl.errorText); assert.isString(myEl.errorText); assert.equal(myEl.errorText, 'Something, somewhere, went wrong'); });}); |
Like before, each specification is followed with an implementation.
[client/components/tc-books/tc-book-form.html]
1 2 3 4 5 6 7 8 | properties: { ... errorText: { type: String, value: 'Something, somewhere, went wrong' }, ... } |
Now we are ready to work on the paper-toast element.
[client/test/tc-book-form.html]
01 02 03 04 05 06 07 08 09 10 11 12 13 | describe('toast element', function() { it('is defined', function() { assert.isDefined(myEl.$.toast); }); it('binds text to errorText property', function() { myEl.errorText = 'This text is displayed when request fails'; assert.equal(myEl.$.toast.text, myEl.errorText); });}); |
Implementation is following.
[client/components/tc-books/tc-book-form.html]
1 | <paper-toast id="toast" text="[[errorText]]"></paper-toast> |
Put paper-toast implemented we can specify the _handleError function.
[client/test/tc-book-form.html]
01 02 03 04 05 06 07 08 09 10 11 12 13 14 15 16 17 18 19 20 21 22 23 24 | describe('_handleError function', function() { it('is defined', function() { assert.isDefined(myEl._handleError); }); it('calls toast show method', function() { var el = fixture('fixture'); el.$.toast.show = sinon.mock(); el._handleError(); sinon.assert.calledOnce(el.$.toast.show); }); it('sets error text property', function() { var expected = 'Panic!!!'; myEl._handleError(expected); assert.equal(myEl.errorText, expected); });}); |
The implementation is following.
[client/components/tc-books/tc-book-form.html]
1 2 3 4 | _handleError: function(text) { this.errorText = text; this.$.toast.show();} |
Since we already have the _submit function that adds and updates books, we might want to complete that with a _delete function.
Delete Specifications
We should start with another iron-ajax element. This one will be sending DELETE requests to the server.
Back-end expects DELETE request to be sent to the /api/v1/book/_id/[ID] URL where [ID] is the number that identifies the book that should be removed.
[client/test/tc-book-form.html]
01 02 03 04 05 06 07 08 09 10 11 | describe('deleteAjax element', function() { it('is defined', function() { assert.isDefined(myEl.$.deleteAjax); }); it('sets method to DELETE', function() { assert.equal(myEl.$.deleteAjax.method, 'DELETE'); });}); |
The implementation is following.
[client/components/tc-books/tc-book-form.html]
1 2 3 | <iron-ajax id="deleteAjax" method="DELETE"></iron-ajax> |
With the deleteAjax up and running, we should create a function that will configure it and call the generateRequest function.
[client/test/tc-book-form.html]
01 02 03 04 05 06 07 08 09 10 11 12 13 14 15 16 17 18 19 20 21 22 23 24 25 | describe('_delete function', function() { it('is defined', function() { assert.isDefined(myEl._delete); }); it('sets deleteAjax.url', function() { var id = 749; myEl._data = {_id: id}; myEl._delete(); assert.equal(myEl.$.deleteAjax.url, myEl.requestUrl + '/_id/' + id); }); it('calls deleteAjax.generateRequest', function() { var el = fixture('fixture'); el.$.deleteAjax.generateRequest = sinon.mock(); el._delete(); sinon.assert.calledOnce(el.$.deleteAjax.generateRequest); });}); |
The implementation is following.
[client/components/tc-books/tc-book-form.html]
1 2 3 4 | _delete: function() { this.$.deleteAjax.url = this.requestUrl + '/_id/' + this._data._id; this.$.deleteAjax.generateRequest();} |
Finally, all we need now is the Delete button that will call the _delete function whenever clicked. However, before we start working on the button, let us define a property that will allow users of our component to change the text of the button.
[client/test/tc-book-form.html]
1 2 3 4 5 6 7 8 | describe('deleteText property', function() { it('is defined', function() { assert.isString(myEl.deleteText); assert.equal(myEl.deleteText, 'Delete'); });}); |
The implementation is following.
[client/components/tc-books/tc-book-form.html]
1 2 3 4 5 6 7 8 | properties: { ... deleteText: { type: String, value: 'Delete' } ...} |
With this property out of the way, we are ready to specify the Delete button.
[client/test/tc-book-form.html]
01 02 03 04 05 06 07 08 09 10 11 12 13 14 15 16 17 18 19 20 21 22 | describe('delete element', function() { it('is defined', function() { assert.isDefined(myEl.$.delete); }); it('binds to deleteText property', function() { myEl.deleteText = 'Hello'; assert.equal(myEl.$.delete.textContent.trim(), myEl.deleteText); }); it('calls _delete function when clicked', function() { var el = fixture('fixture'); el._delete = sinon.mock(); el.$.delete.click(); sinon.assert.calledOnce(el._delete); });}); |
The implementation is following.
[client/components/tc-books/tc-book-form.html]
1 | <paper-button id="delete" on-tap="_delete">[[deleteText]]</paper-button> |
While we are at the subject of buttons, we might want to add the Submit button as well. We already finished the _submit function so the only thing left is the element itself and a property we’ll bind to.
Submit Button Specifications
The Submit button and the submitText property are almost the same as the delete specifications we did previously.
We’ll start with the property.
[client/test/tc-book-form.html]
1 2 3 4 5 6 7 8 | describe('submitText property', function() { it('is defined', function() { assert.isString(myEl.submitText); assert.equal(myEl.submitText, 'Submit'); });}); |
The implementation is following.
[client/components/tc-books/tc-book-form.html]
1 2 3 4 5 6 7 8 | properties: { ... submitText: { type: String, value: 'Submit' }, ...} |
Now we can move onto the button itself.
[client/test/tc-book-form.html]
01 02 03 04 05 06 07 08 09 10 11 12 13 14 15 16 17 18 19 20 | describe('submit element', function() { it('is defined', function() { assert.isDefined(myEl.$.submit); }); it('binds text to submitText property', function() { assert.equal(myEl.$.submit.textContent.trim(), myEl.submitText); }); it('calls _submit function on click', function() { var el = fixture('fixture'); el._submit = sinon.mock(); el.$.submit.click(); sinon.assert.calledOnce(el._submit); });}); |
The implementation is following.
[client/components/tc-books/tc-book-form.html]
1 | <paper-button id="submit" on-tap="_submit">[[submitText]]</paper-button> |
To Be Continued
This article is finished and we have a working version of our books form. You can see the result by opening http://localhost:8080/components/tc-books/demo/index.html. Enter some data, click the Submit button and a new book will be stored in the database. Modify data of a book and click Submit again and data will be updated. Delete button has the obvious function. We can see the result of different operations by directly querying the back-end on http://localhost:8080/api/v1/books.
If you had trouble following the examples, the complete source code can be found in the polymer-book-form branch of the books-service repository.
1 | git checkout polymer-book-form |
While what we did works, it is far from being complete. We cannot open an existing book, error handling from iron-ajax components is not yet implemented and users of our component cannot be notified of what happened. These and few other improvements will be the subject of the Polishing The First Component article.
- Docker Compose sometimes throws a timeout error when displaying logs. If that happens, alternative is to re-run it or use the
docker logscommand.
| Reference: | Developing Front-End Microservices With Polymer Web Components And Test-Driven Development (Part 1/5): The First Component from our WCG partner Viktor Farcic at the Technology conversations blog. |
