Developing Front-End Microservices With Polymer Web Components And Test-Driven Development (Part 5/5): Using Microservices
In the previous article we built two Web Components (tc-book-form and tc-books), learned how to change their style through properties, how to control them through exposed functions as well as how to connect them using custom events. We developed most of the code using Test-Driven Development approach. Both front-end Web Components and back-end server are packed into a single microservice and stored as a Docker container. We did not do the last part (Docker build, push and run) together and we’ll correct that by exploring, among other things, containers definition, building and running in this article.
With all this in place, we are ready to import components we did in previous articles into a separate Web Application.
This article is part of Developing Front-End Microservices With Polymer Web Components And Test-Driven Development series:
- The First Component
- Polishing The First Component
- The Second Component
- Styling And Communication
- Using Microservices
What Are We Trying To Do?
The idea we’re trying to promote is to build Web Components and package them together with back-end into micoservices. With this approach, our Web Application will be very small in terms of code. It will be primarily in charge of importing, routing and scripts that do the interaction between different Web Components. Most of the code is “outside” the application. That way we can develop distinct features independently from each others, have easier and faster testing, deploy as soon as one of them is done instead of waiting for everything, etc.
Microservices is a subject that deserves its own book or a set of articles so we won’t go into details of their benefits and downsides. The important part is that in this series we’re breaking from common microservices architecture where they contain only back-end APIs. In this case they have everything related to a (group of) feature(s) by packaging front-end components as well. We still have, in a way, monolithic Web Application (the one we’ll explain shortly) but this time its scope is very small and limited. You can consider this application a “scaffold” where all microservices are united.
The code for the Web Application we’re building is based on Polymer Starter Kit. It is a very easy way to build Polymer based applications. However, in my opinion, it is not designed as a “serious” framework that should be used for big applications and more for learning purposes. Actually, it is not a framework but a set of libraries. “Real” big application should still be built with one of the frameworks like AngularJS. Polymer is about building Web Components that imported into Web Applications built with whatever framework we choose. We’ll still use the Polymer Starter Kit since it gives us a very convenient way to demonstrate some of the examples we’ll go through.
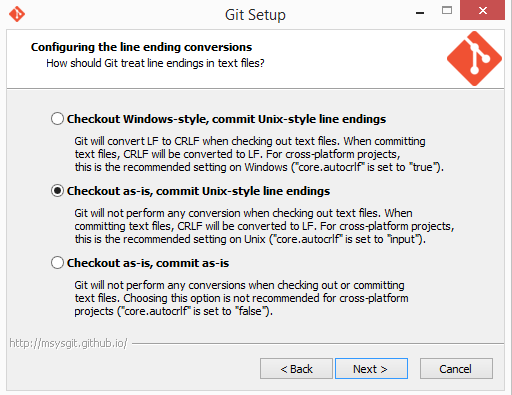
Unlike the previous articles in this series where we wrote the code together, in this one the code is already done and can be found in the vfarcic/books-fe-polymer repository. Assuming that you already have Git installed, please run the following command. If you are using Windows, please make sure that Git is checking files out with as-is option1.
git clone https://github.com/vfarcic/books-fe-polymer.git
cd books-fe-polymer
We won’t go through all of it but only things that were created specifically for this article. The rest comes from the Polymer Starter Kit that is already very well documented.
As in previous articles, you will need Docker and Docker Compose to be installed on your system. In you have trouble installing Docker Compose, I prepared a Vagrant VM with everything installed and ready to be used. Personally, I prefer running my own VM through Vagrant than using Boot2Docker. Behind the scenes, Boot2Docker is a wrapper around Vagrant anyways. Please execute commands that follow if you want to run examples through VirtualBox and Vagrant2.
vagrant up dev
vagrant ssh dev
cd /vagrant
We should start with the setup of development environment.
Development Environment
You already saw in the previous articles that I prefer using Docker not only to package and deploy applications to production but also for development environment as well. When we worked with tc-books and tc-book-form we used container to download dependencies with NodeJS and Bower, run tests in browsers, run back-end that requires on Scala, etc. We’ll use the similar approach now as well. This time we’ll go into a bit more details (without trying to provide extensive Docker tutorial).
In order to set up Polymer Starter Kit we need to have NodeJS, npm, Gulp and bower installed. With them we need to download all npm and Bower dependencies, use Gulp to serve static files and create distribution, etc. If you are a front-end developer it is likely that you already have all those tools installed on your machine. However, I find it easier to have everything packaged into one container that is ready to be run whenever we need it. That way I don’t need to worry about requirements of one particular project as long as I know that there is a container waiting for me to run it.
This becomes even more useful since I tend to work with different languages and frameworks. Sometimes it’s JS with Angular, at other times with some other framework. In some cases we use Gulp and in others Grunt. And it’s not always JS. There is Scala, Java, Python, etc. Microservices allow us to choose the best tools for the job unlike monoliths that often force us to stick with whatever choices we made at the beginning. You already experienced that with the components we worked on earlier. You might not have had Scala and SBT installed and they were provided for you in form of the container we were running.
In order to utilize this approach, we’ll use Docker and Docker Compose. While latter is not mandatory, it provides a handy way to run containers without remembering, often long, list of parameters. Even more importantly, the rest of the team would greatly benefit of this approach by having Docker as the only requirement to set up the environment.
Creating Development Environment
Everything required for development of our Web Application can be found in the Dockerfile.dev.
FROM debian:jessie
MAINTAINER Viktor Farcic "viktor@farcic.com"

# NodeJS, Git, bzip2
RUN apt-get update &&
    apt-get -y install curl &&
    curl -sL https://deb.nodesource.com/setup_0.12 | bash - &&
    apt-get -y install nodejs git bzip2 &&
    apt-get clean &&
    rm -rf /var/lib/apt/lists/*

# Gulp, bower
RUN npm install -g gulp bower

# Source
ADD bower.json /bower.json
ADD gulpfile.js /gulpfile.js
ADD package.json /package.json

# Dependencies
RUN npm install && bower install --allow-root --config.interactive=false -s

# Scripts
ADD dev.sh /dev.sh
RUN chmod +x /dev.sh

CMD ["/dev.sh"]
It should be easy to understand what this Dockerfile.dev does. It installs NodeJS (it comes with npm) and few other Debian packages, installs gulp and bower and copies required files; bower.json, gulpfile.js, package.json and dev.sh. The last one is the one that will be executed whenever we run this container. Once files are added, we’re downloading NPM and Bower dependencies. We specified all this as a separate Dockerfile.dev since this container will be used only for development purposes. Later on we’ll see the Dockerfile as well.
Content of the dev.sh is as follows.
gulp serve
Every time we run this container, we’ll install all npm and bower dependencies and, finally, run the gulp serve that will act as our development server.
To build this container, command would be:
sudo docker build -t vfarcic/books-fe-polymer-dev -f Dockerfile.dev .
sudo docker push vfarcic/books-fe-polymer-dev
The second command pushes all the images to Docker Hub so that it can be easily reused by others. If your organization does not allow the usage of public repository, you can easily set up your own and push it there. If you try this by yourself, please change vfarcic to your own username. Even though you do not have permissions to push it under my username, it is still public and you will be able to pull this container and use it throughout this article.
Running Development Environment
Let us quickly go through things that we need to run in order to make the application work. First of all, there is the Web Application that we explained above. Since we will be using tc-books and tc-book-form Polymer Web Components with their own back-end packaged as a microservice into a separate container, we’ll need to run that as well. Finally, with two servers listening to different ports, we’ll need a proxy server as well. We’ll use nginx container. All in all, we’ll use three containers to set up our development environment. In the future, as number of our microservices grows, so will the number of containers. This might sound like a lot of hassle. However, Docker Compose makes this very easy to handle.
Here’s how docker-compose-dev.yml looks like.
appDev:
  image: vfarcic/books-fe-polymer-dev
  volumes:
    - app:/app
  ports:
    - 8081:3000
nginxDev:
  image: nginx
  volumes:
    - conf/nginx.conf:/etc/nginx/nginx.conf
  ports:
    - 8080:80
booksServiceDev:
  image: vfarcic/books-service
  volumes:
    - /data/tests/db:/data/db
  ports:
      - 8082:8080
We specified three containers we discussed earlier; appDev (our Web Application), nginxDev (reverse proxy) and booksServiceDev (microservice with Web Components we built in the previous articles). Each of them has image, volumes, ports and all other information needed to bring up the containers. All we need to do to run the full development environment is the following command.
sudo docker-compose -f docker-compose-dev.yml up
It will run all three containers and display the combined output on the screen. Bear in mind that the first time you run this, it might take some time until all images are downloaded. All consecutive runs will be much faster.
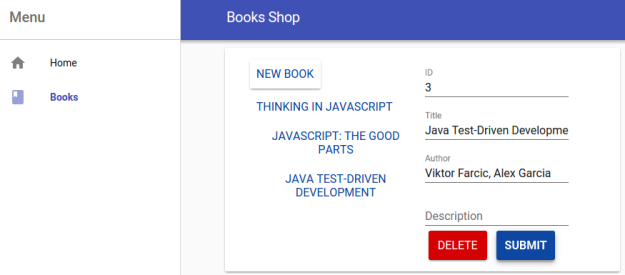
Go ahead and open http://localhost:8080/ in your favorite browser. You’ll see books item in the left-hand menu. It opens a screen with components we developed earlier.
All the application code is located in the app directory. If you go back to the docker-compose-dev.yml file you’ll see that we are setting this directory as one of container’s shared volumes. Since the source code on our machine is shared with the container, any change we make to will be reflected in the server we are running through Docker. Go ahead, change any source file, refresh browser and observe that changes are visible.
Finally, before moving to the source code of the application, let us quickly go through the nginx configuration located in the conf/nginx.conf file.
worker_processes  1;
events {
  worker_connections  1024;
}
http {
  server {
    listen       80;
    server_name  _;
    location /api/v1/books {
      proxy_pass http://172.17.42.1:8082/api/v1/books;
    }
    location /components/tc-books {
      proxy_pass http://172.17.42.1:8082/components/tc-books;
    }
    location / {
      proxy_pass http://172.17.42.1:8081/;
    }
  }
}
In it you can see that all requests to /api/v1/books (back-end API) and /components/tc-books (Web Components) are redirected to the port 8082, all the rest (Web Application itself), goes to the port 8081. If you go back to the docker-compose-dev.yml you’ll see that those are the same ports we are exposing when running containers. This configuration file is shared inside the nginx container as a volume.
With reverse proxy up and running, all API services, Web Components and the application work as they are one unique application even though they are running on different ports. In production those services might be distributed across different servers in which case nginx would handle not only ports but also IPs. While at the subject of IPs, 172.17.42.1 is the default address Docker uses when referring to the localhost of the host. Otherwise, if we simply put localhost instead, it would refer to the localhost inside the container.
With the development environment up and running, let us have a look at the application itself.
Importing Remote Polymer Web Components Into A Web Application
Importing and using Web Components we developed in previous articles is not (much) different from what we did in their demo page. The major difference is that this time we’re using the code structure inherited from the Polymer Starter Kit. Imports of our Web Components and their usage is in the app/index.html, Polymer elements are imported in the app/elements/elements.html, app/scripts/app.js contains event listeners and properties we’re using to customize styles are in the app/styles/app-theme.html.
The major difference from what the started kit proposes are import statements for our Web Components that are located in the app/index.html.
[app/index.html]
<link rel="import" href="/components/tc-books/tc-books.html">
<link rel="import" href="/components/tc-books/tc-book-form.html">
Even though the href looks “normal”, those two imports will load HTMLs remotely since they are located in the separate microservice with its own server. That way we have a clear separation and services are complete with both front-end and back-end. However, there is one downside of this approach. Part of the process when building production version of the application is vulcanization; concatenation and minification all source files. Since it works only with locally downloaded files, those residing on a different server will not be included. I think that this is not a big price to pay when compared with benefits this type of architecture provides.
With this being said, let us take a look at how we could create a production version of our application.
Building and Deploying Production Container
Similarly as we have a Dockerfile.dev that can be used to set up development environment, there is Dockerfile that can be used to run the container in production.
We should strive to have containers small and only with things we actually need. This is even more true for production than for other environments. While we could (with few additions) use the Dockerfile.dev in production, it contains too many things we do not actually need. Bower is required for downloading dependencies but not running the application in production. While gulp serve is a very handy way to run a static files server, it is nowhere as good and efficient as, let’s say, nginx. There are other reasons but we won’t go through all of them.
Dockerfile that we’ll use is as simple as following.
[Dockerfile]
FROM nginx
MAINTAINER Viktor Farcic "viktor@farcic.com"

ADD dist /usr/share/nginx/html
It extends from nginx official Docker container and adds dist to the directory it uses to serve static files.
In order to build the production version of our application we should do the following steps.
- Create distribution
- Build the container
- Test whether everything works correctly
- Push the container to Docker registry
Creating distribution is easy since Polymer Starter Kit already has the (default) Gulp task that does it for us. Since we already have the Docker image vfarcic/books-fe-polymer-dev that contains everything we need to run Gulp, all that is left is to create another Docker Compose file where we’ll specify required parameters. In our case, that file is docker-compose-build.yml.
[docker-compose-build.yml]
dist:
  image: vfarcic/books-fe-polymer-dev
  volumes:
    - app:/app
    - dist:/dist
  command: gulp
We setup few shared volumes including dist. Whatever is built inside the container directory dist will be accessible in the directory (with the same name) on our computer. The major difference when compared with docker-compose-dev is that instead of running the default command /dev.sh, this time we’ll run gulp.
We can run this Docker Compose by executing the following.
sudo docker-compose -f docker-compose-build.yml run dist
The process copied all the files, passed jshint, run vulcanize, etc. The end result is the dist directory that contains all the application files prepared for production usage.
With this in place, we can build the container and push it to the registry (in this case Docker Hub).
sudo docker build -t vfarcic/books-fe-polymer .
sudo docker push vfarcic/books-fe-polymer
If you try this by yourself, please make sure to change vfarcic to your own user.
With the container pushed to the registry, we can pull it and run it in any server.
As before, this container is accompanied with Docker Compose configuration named docker-compose.yml.
[docker-compose.yml]
app:
  image: vfarcic/books-fe-polymer
It does not have any parameter (except image) since, in my case, it should be deployed with Docker Swarm. We won’t discuss it here (link to an article with more details is presented below).
There are many different things we would need to consider before deploying this to production. It can be as simple as what I prepared in the docker-compose-sim.yml. The primary purpose of this Docker Compose configuration is to simulate production environment on developer’s laptop but, in many cases, this might be enough for real production as well.
[docker-compose-sim.yml]
appSim:
  extends:
    file: docker-compose.yml
    service: booksFe
nginxSim:
  extends:
    file: docker-compose-dev.yml
    service: nginxDev
booksServiceSim:
  extends:
    file: docker-compose-dev.yml
    service: booksServiceDev
This configuration file does nothing new but combines specifications from the other two we saw earlier.
You can run it with the following command.
sudo docker-compose -f docker-compose-sim.yml up
For more detailed and powerful deployment tactics that include dynamic discovery, automatic scaling and many other useful features, please consult the article series Scaling To Infinity With Docker Swarm, Docker Compose and Consul. A bit less complex (and less dynamic) way to deploy is explained in the article Continuous Integration, Delivery Or Deployment with Jenkins, Docker and Ansible. Bear in mind that more complex or more feature rich way of doing things does not necessarily means better. It all depends on your needs and any of the three ways (with anything in between) might be perfectly valid.
The End
![]() It all started with the Including Front-End Web Components Into Microservices article where we discussed potential benefits of creating microservices that contain both front-end and back-end and how Web Components might help with this task.
It all started with the Including Front-End Web Components Into Microservices article where we discussed potential benefits of creating microservices that contain both front-end and back-end and how Web Components might help with this task.
In the first two articles of this series (The First Component and Polishing The First Component) we made the first Polymer Web Component and placed into a microservice together with back-end that acts as API. Later on in The Second Component article we built the second component inside the same microservice.
Then in the Styling And Communication we explored one of the ways to allow users of our components to influence their style. We also worked on communication between our components through event listeners. Finally, in this last article we imported them into a Web Application, created nginx proxy server that handles redirection to different ports we’re using, and used Docker container as both development and production environment.
- If you are using Windows, please make sure that Git is installed with Checkout as-is option. ↩
- You might want to stop the Vagrant VM from the previous articles. That can be done by exiting the VM (
exit) and executingvagrant halt. ↩
| Reference: | Developing Front-End Microservices With Polymer Web Components And Test-Driven Development (Part 5/5): Using Microservices from our WCG partner Viktor Farcic at the Technology conversations blog. |
