In this example we will build a Bootstrap Autocomplete that helps users with suggestions as they fill text fields. Autocomplete reduces keystrokes and improves usability because user can select a suggestion rather than typing it in. To implement this autocomplete we will use Bootstrap modal window. As a result the user can either press the Enter key or click with mouse to select a suggestion. In addition the number of suggestions will be limited to a maximum of four. So, let’s get started!
1. Tools
Following tools will be used to build this example:
In addition to the above, I have also used a dataset for list of pizza toppings from Corpora
Bootstrap is a front-end framework for designing responsive websites. We also include JQuery since Bootstrap needs it. The JQuery library makes writing JavaScript a breeze. Node.js in essence is JavaScript on the server-side. The Express module is used to create a server to serve files and resources to the browser.
2. Project Structure
The project assets are stored as follows
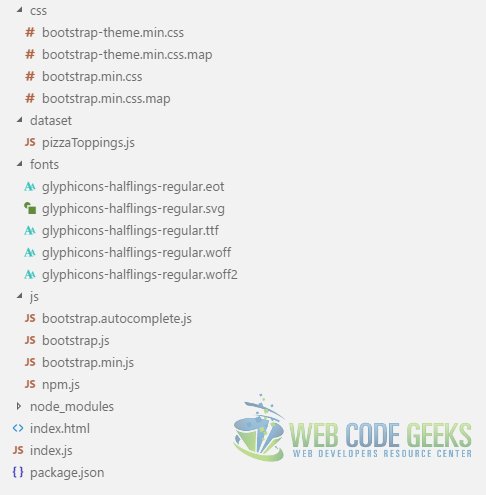
css: The css folder holds the bootstrap css files downloaded from Bootstrap Website.
dataset: We keep the dataset file from Corpora in the dataset folder.
fonts: The fonts which accompany the bootstrap css files are placed in this folder.
js: All JavaScript files, including the ones we create, and also bootstrap files go into this folder.
index.html: This is the root page on which we see the Autocomplete example in action. I borrowed the initial from Bootstrap Getting Started section and then customized it to the project’s requirements.
bootstrap.autocomplete.js: This JavaScript files contains our code to enable the autocomplete feature.
index.js: This file is the entry point of our application.
3. HTML Markup
To begin, we add an input tag decorated with the attribute data-autocomplete with value pizzaToppings to the HTML page and a corresponding label. As a result our index.html page looks like below.
index.html
<!DOCTYPE html>
<html lang="en">
<head>
<meta charset="utf-8">
<meta http-equiv="X-UA-Compatible"content="IE=edge">
<meta name="viewport"content="width=device-width, initial-scale=1">
<!-- The above 3 meta tags *must* come first in the head; any other head content must come *after* these tags -->
<title>Bootstrap Autocomplete Example - Web Code Geeks</title>

<!-- Latest compiled and minified CSS -->
<link rel="stylesheet"href="/css/bootstrap.min.css">

<!-- Optional theme -->
<linkrel="stylesheet"href="/css/bootstrap-theme.min.css">
<!-- HTML5 shim and Respond.js for IE8 support of HTML5 elements and media queries -->
<!-- WARNING: Respond.js doesn't work if you view the page via file:// -->
<!--[if lt IE 9]>
<script src="https://oss.maxcdn.com/html5shiv/3.7.3/html5shiv.min.js"></script>
<script src="https://oss.maxcdn.com/respond/1.4.2/respond.min.js"></script>
<![endif]-->

</head>
<body>
<div class="panel panel-info">
<div class="panel-heading">
<h1>WebCodeGeeks - Bootstrap Autocomplete</h1>
</div>
<div class="panel-body">
<div class="form-group">
<label for="favoritepizzatoppings">Favorite Pizza Topping</label>
<input class="form-control" id="favoritepizzatoppings" data-autocomplete="pizzaToppings" placeholder="Enter favorite pizza topping..."autocomplete="off" />
</div>
</div>
</div>

<!-- jQuery (necessary for Bootstrap's JavaScript plugins) -->
<scriptsrc="https://ajax.googleapis.com/ajax/libs/jquery/1.12.4/jquery.min.js"></script>

<!-- Include all compiled plugins (below), or include individual files as needed -->
<!-- Latest compiled and minified JavaScript -->
<script src="./js/bootstrap.min.js"></script>
<script src="./js/bootstrap.autocomplete.js"></script>
<style type="text/css">
.badge{
margin-left:5px;
}
.modal{
right:auto;
}
</style>
</body>
</html>
4. JavaScript
In this section we will write the JavaScript required to enable the autocomplete feature. Lets go through the JavaScript functions one by one and learn what each one does.
4.1. Get Suggestions List
First of all we loop over input tags decorated with data-autocomplete attribute while fetching list of suggestions for each. Since we are accessing DOM elements the page needs to be rendered completely therefore we write the code in JQuery document ready callback.
bootstrap.autocomplete.js
var suggestions = {};

var autocompleteWidget;
$(document).ready(function () {

//Iterate over all the input tags in the document with an attribute data-autocomplete
$.each($("input[data-autocomplete]"), function (index, item) {
var entityName = $(item).attr('data-autocomplete');
fetchSuggestionsFromServer('/dataset/' + entityName + '.js', entityName);
});
});
4.2. Add click event handler for suggestions
Then we bind to click event of each suggestion because when a suggestion is clicked we want to populate its value in the input tag and close the suggestions list.
bootstrap.autocomplete.js
//Bind to click event of each suggestion displayed and populate the input tag with its value on click
$(document).on("click", "a.list-group-item", function (e) {
var code = e.code || e.which;
var target = e.target;
if ( code !== 1 || !autocompleteWidget || !target) return;
$(autocompleteWidget["wcg-autocomplete-input"]).val($(target).text());
$(autocompleteWidget).modal('hide');
});
4.3. Setup Input Tags
Finally we call the method that makes the magic. This method sets up each input tag so that a suggestions list can be displayed when the user enters data into them.
bootstrap.autocomplete.js
//Setup the input tags to display suggestions by binding to their keyup event
autocompleteSetup();
4.3.1. autocompleteSetup Function
Here we handle the keyup event of each input. So that we can handle Up or Down Arrow keys as well as Enter key pressed by a user. We move the highlighting among suggestions according to the Arrow key pressed. But if Enter key is pressed we populate the selected suggestion in the input. In case of any other key we update the list of displayed suggestions.
bootstrap.autocomplete.js
function autocompleteSetup() {
$(document).on("keyup", "input[data-autocomplete]", function (event) {
var code = event.code || event.which;

//If the user presses the up arrow or down arrow key, move the selected suggestion as well
if (code === 38) {
var next = $("a.list-group-item.active").prev();

if (next) {
$("a.list-group-item.active").removeClass("active");
$(next).addClass("active");

}
return;

} else if (code === 40) {
var prev = $("a.list-group-item.active").next();
if (prev) {
$("a.list-group-item.active").removeClass("active");
$(prev).addClass("active");
}
return;
}

//Display suggestions based on what the user has typed in so far
if (code !== 13){
displaySuggestions(getSuggestions($(this).val(), this), this);
}

//If the user clicks the Enter key
if (code === 13 && autocompleteWidget) {
$(this).val($("a.list-group-item.active").text());
$(autocompleteWidget).modal('hide');
}

});
};
4.3.2. getSuggestions Function
This function creates the Html markup with the list of matching suggestions. Then it shows it as a Bootstrap modal window under the input tag that it has passed to it.
bootstrap.autocomplete.js
function getSuggestions(searchTerm, element) {
var suggestionList = "";
var firstSuggestion = "<a class='list-group-item active'>";
var suggestion = "<a class='list-group-item'>";

if (searchTerm === "") {
return "";
}
var list = $.grep(suggestions[$(element).attr('data-autocomplete')], function (s) {
return s.toLowerCase().indexOf(searchTerm.toLowerCase()) === 0;
});


$.each(list.slice(0, (list.length > 5 ? 4 : list.length)), function (index, item) {
if (index === 0) {
suggestionList = suggestionList + firstSuggestion + item + "</a>";
} else {
suggestionList = suggestionList + suggestion + item + "</a>";
}

}, this);

suggestionList = suggestionList;
return suggestionList;

};
4.3.3. Get Suggestions from Server
Using JQuery’s getJSON function we request the suggestions list and store it in the suggestions object. The suggestions object stores each input tags suggestions in a separate key-value pair. The key is value of the data-autocomplete attribute and value is the list of suggestions.
bootstrap.autocomplete.js
function fetchSuggestionsFromServer(suggestionsUrl, suggestionsFor) {

if(suggestions.hasOwnProperty(suggestionsFor)){
return;
}
$.getJSON(suggestionsUrl, function (response) {
suggestions[suggestionsFor] = response[suggestionsFor];
});

}
4.3.4. Display Suggestions
This method displays the markup with the list of suggestions passed to it by creating a new or updating the existing autocomplete modal window. The modal window is also positioned under the related element.
bootstrap.autocomplete.js
function displaySuggestions(suggestions, element) {

if (suggestions.length === 0) {

if (autocompleteWidget) $(autocompleteWidget).modal('hide');

return;
}
var suggDiv;
if (autocompleteWidget) {
suggDiv = $(autocompleteWidget);
}
else {
suggDiv = $("<div id='wcg-modal' class='modal fade' data-backdrop='false'></div>");
}

suggDiv.html(suggestions);

if (!autocompleteWidget) {
$(document.body).append(suggDiv);

autocompleteWidget = suggDiv;
}
$(autocompleteWidget).css({
left: $(element).position().left + "px",
top: $(element).position().top + $(element).height() + 8 + "px"
});
autocompleteWidget["wcg-autocomplete-input"] = element;
$(autocompleteWidget).modal('show');
};
5. Running the Project
To run the project we type the following in a command window at the root of the project:
project root>npm install
project root>node index.js
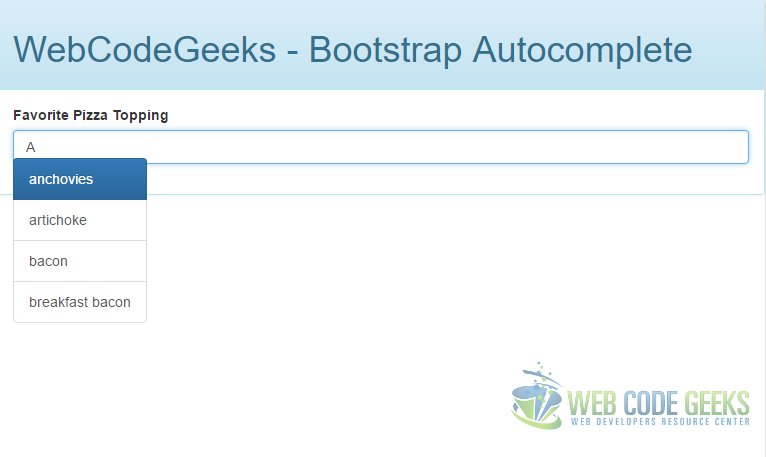
6. Output
Navigate to the URL http://localhost:3000/ in a browser and you should see the following output.
7. Download the Source Code
This wraps up the Bootstrap Autocomplete Example.
You can download the full source code of this example here: Bootstrap Autocomplete Example

What if I want to add more data inside the folder dataset.
Please help and let me know
Hi, By add more data, if you mean add more values to the existing .js file then you can use any text file editor to add more options. But if you mean to add another list of values from a different domain for use as autocomplete with another control. Then you can place another file with .js extension containing the JSON structured data. For example if you need to add autocomplete options for Dog breeds, create a file named Breeds.js. You should place the file in the dataset folder. Now the input tag with which you want to use it,… Read more »